Series 0i/0i Mate - Model B Connection manual (Hardware) Page 214
Connection manual (Hardware)
B–63833EN/03
9. CONNECTION TO FANUC I/O Link
200
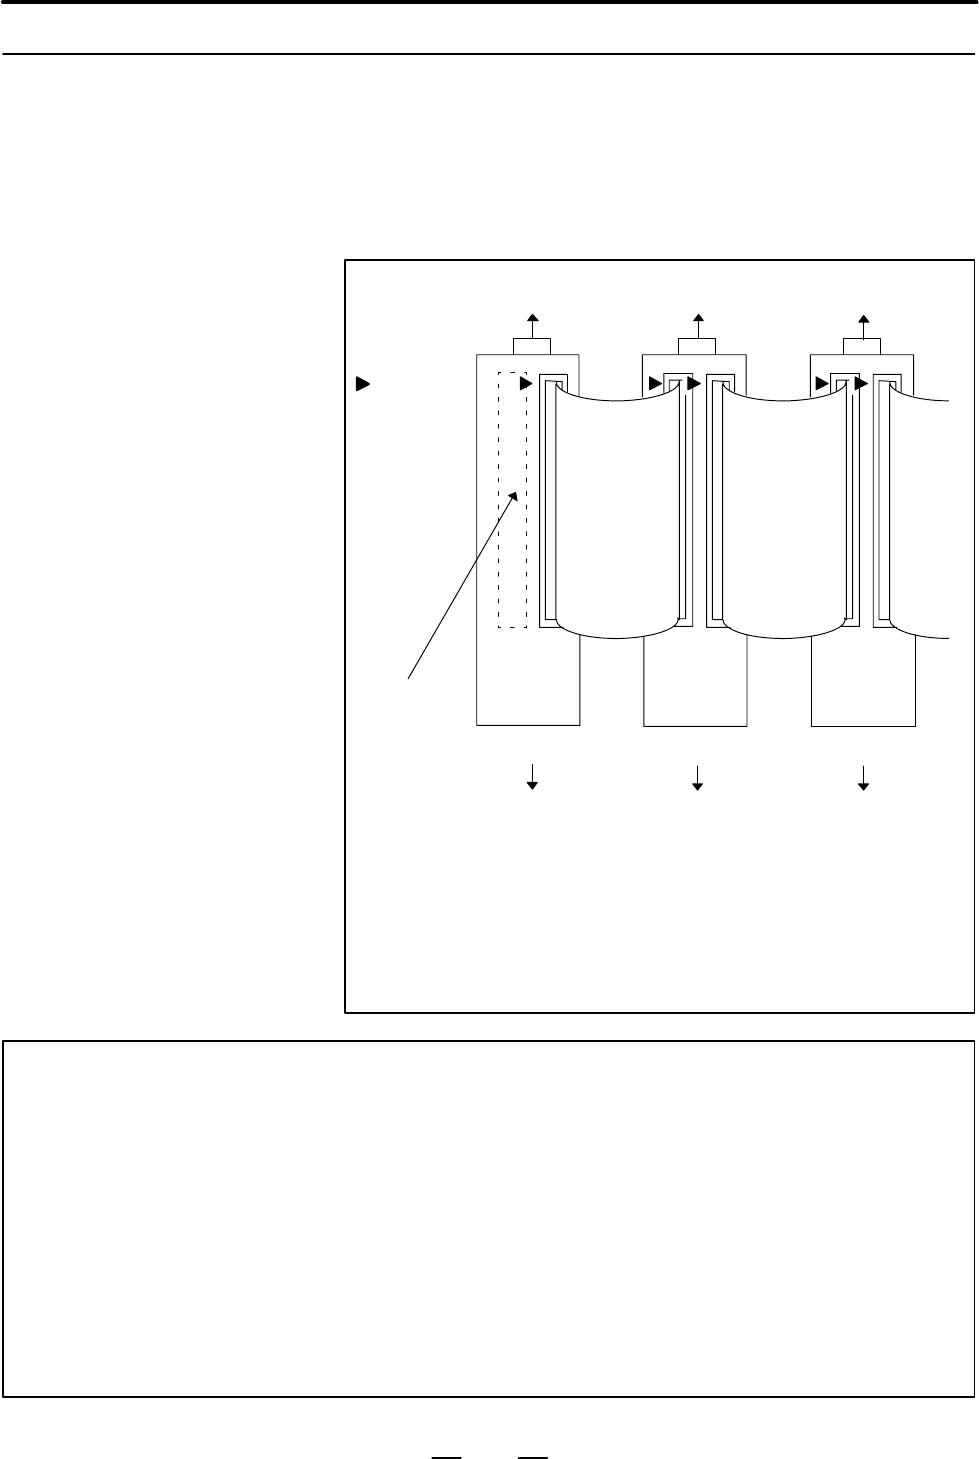
Modules can be connected in the same way, regardless of whether you are
connecting the basic module to an expansion module or connecting two
expansion modules. Connect the modules by using 34–pin flat cable
connectors as shown in the figure below. Ensure that all 34 pins at one
end of the cable are connected to the corresponding pins at the other end;
e.g., connect the A1 pin to the pin having the same designation (A1) at
the other end.
DI/DO interface side DI/DO interface side DI/DO interface side
A1 pin mark
34–pin flat cable
34–pin flat cable
34–pin flat cable
Basic module
Expansion module Expansion module
CA52
CA52
CA53
CA52
Top view
Flat cable–side connector specification:
HIF3BA–34DA–2.54R (Hirose Electric Co., Ltd.)
Module connector–side specification:
HIF3BA–34PA–2.54DS (Hirose Electric Co., Ltd.) or
FAP–3403–1202–0BS (Yamaichi Denki Co., Ltd.)
CA55
Ventilation
slot
DIN rail
mounting side
DIN rail
mounting side
DIN rail
mounting side
NOTE
Modules need to be spaced at least 32 mm apart, in which case a flat cable of about 20 mm
in length is required. To install modules further away from each other, the cable length will be
20 mm plus the extra distance. Note that the maximum length of a flat cable is 300 mm. To
ensure adequate ventilation, install the modules in such a way that the flat cables lie on top of
them. The basic module has a vent at the top (as indicated by the dotted lines in the above
figure). When connecting modules, install expansion modules so that the flat cables do not
cover the vent, as shown in the above figure.
Therefore, for direct connection to the connection printed circuit board, expansion modules are
installed to the right of the basic module on the installation plane. For installation using DIN
rails or screws, expansion modules are installed to the left of the basic module on the installation
plane.
9.6.17
Connection of Basic
and Expansion
Modules
Contents Summary of Series 0i/0i Mate - Model B Connection manual (Hardware)
- Page 1* FANUC Series 0 -MODEL B FANUC Series 0 * Mate-MODEL B CONNECTION MANUAL (HARDWARE) B-63833EN/03
- Page 2Ȧ No part of this manual may be reproduced in any form. Ȧ All specifications and designs are subject to change without notice. In this manual we have tried as much as possible to describe all the various matters. However, we cannot describe all the matters which must not be done, or which cannot be
- Page 3B–63833EN/03 DEFINITION OF WARNING, CAUTION, AND NOTE DEFINITION OF WARNING, CAUTION, AND NOTE This manual includes safety precautions for protecting the user and preventing damage to the machine. Precautions are classified into Warning and Caution according to their bearing on safety. Also, supplem
- Page 4
- Page 5B–63833EN/03 PREFACE PREFACE This manual describes the electrical and structural specifications required for connecting the FANUC Series 0i/0i Mate CNC control unit to a machine tool. The manual outlines the components commonly used for FANUC CNC control units, as shown in the configuration diagram
- Page 6PREFACE B–63833EN/03 Configuration of the This manual consists of Chapters 1 to 14 and Appendixes. manual Chapter title Description Chapter 1 Outlines connections for the Series 0i/0i Mate and guides the reader CONFIGURATION concerning additional details. Chapter 2 This chapter shows the total conne
- Page 7B–63833EN/03 PREFACE Related manuals of The following table lists the manuals related to Series 0i–B, Series 0i Series 0i–B/0i Mate–B Mate–B. This manual is indicated by an asterisk(*). Specification Manual name number FANUC Series 0i–MODEL B/0i Mate–MODEL B B–63832EN DESCRIPTIONS FANUC Series 0i–PB
- Page 8PREFACE B–63833EN/03 Specification Manual name number OPEN CNC FANUC OPEN CNC OPERATOR’S MANUAL B–62994EN Basic Operation Package 1 (For Windows 95/NT) FANUC OPEN CNC OPERATOR’S MANUAL B–63214EN (DNC Operation Management Package) Related manuals of The following table lists the manuals related to SE
- Page 9B–63833EN/03 Table of Contents DEFINITION OF WARNING, CAUTION, AND NOTE . . . . . . . . . . . . . . . . . . . . . . . . . . s–1 PREFACE . . . . . . . . . . . . . . . . . . . . . . . . . . . . . . . . . . . . . . . . . . . . . . . . . . . . . . . . . . . . . . . . p–1 1. CONFIGURATION . . . . . . . .
- Page 10Table of Contents B–63833EN/03 5.1.3 Various LCD Units Interface . . . . . . . . . . . . . . . . . . . . . . . . . . . . . . . . . . . . . . . . . . . . . . . . . . . . . . . . . 53 5.1.4 Connection to the Standard MDI Unit . . . . . . . . . . . . . . . . . . . . . . . . . . . . . . . . . . . . . .
- Page 11B–63833EN/03 Table of Contents 9.1 GENERAL . . . . . . . . . . . . . . . . . . . . . . . . . . . . . . . . . . . . . . . . . . . . . . . . . . . . . . . . . . . . . . . . . . . . . 127 9.2 CONNECTION . . . . . . . . . . . . . . . . . . . . . . . . . . . . . . . . . . . . . . . . . . . . . . . . . .
- Page 12Table of Contents B–63833EN/03 9.5.7 External Dimensions . . . . . . . . . . . . . . . . . . . . . . . . . . . . . . . . . . . . . . . . . . . . . . . . . . . . . . . . . . . . . . . 169 9.5.7.1 Outline drawing and panel–cut drawing of the small machine operator’s panel . . . . . . . . . . . . 170 9
- Page 13B–63833EN/03 Table of Contents 9.8.8 Specifications . . . . . . . . . . . . . . . . . . . . . . . . . . . . . . . . . . . . . . . . . . . . . . . . . . . . . . . . . . . . . . . . . . . . 241 9.8.9 Other Notes . . . . . . . . . . . . . . . . . . . . . . . . . . . . . . . . . . . . . . . . . . . . .
- Page 14Table of Contents B–63833EN/03 14.7 PERIPHERAL EQUIPMENT AND CONNECTION . . . . . . . . . . . . . . . . . . . . . . . . . . . . . . . . . . . . 292 14.7.1 Connector Layout Diagram . . . . . . . . . . . . . . . . . . . . . . . . . . . . . . . . . . . . . . . . . . . . . . . . . . . . . . . . . 292 14
- Page 15B–63833EN/03 1. CONFIGURATION 1 CONFIGURATION 1
- Page 161. CONFIGURATION B–63833EN/03 1.1 The following figure shows the configuration of FANUC Series 0i/0i Mate control unit. NAME OF EACH PART This manual describes how to connect the units illustrated in this diagram. OF CONTROL UNIT The numbers in parentheses shown in the diagram are section references
- Page 17B–63833EN/03 1. CONFIGURATION Memory back up battery (4.4) Memory card slot LED for display of status/alarm I/O device (RS232C) connector Analog spindle (5.3) connector (6.2) High–speed skip connector Serial spindle (5.5) connector (6.1) Position coder connector MDI connector (for analog spindles) (
- Page 181. CONFIGURATION B–63833EN/03 1.2 GENERAL OF HARDWARE I/O board Main board (Series 0i only) S Power PCB (built–in) S DI/DO DC–DC converter S Manual pulse generator S Main CPU control S Memory S Data server System software, Macro program, Ladder program, Parameter, and etc. S PMC control S I/O Link c
- Page 19B–63833EN/03 2. TOTAL CONNECTION DIAGRAM 2 TOTAL CONNECTION DIAGRAM Total connection diagram for Series 0i Main board 24V–IN(CP1) Power supply 24VDC 24V–OUT(CP2) To I/O device LCD unit LCD/MDI unit Optical fiber cable MDI unit DISPLAY(COP20A) COP20B 24VDC CP1A CK2 CP1B CA55 CK1 CRT unit CRT/MDI unit
- Page 202. TOTAL CONNECTION DIAGRAM B–63833EN/03 Main board Mini slot HSSB board To other device ETHERNET board PROFIBUS board DeviceNet board FL–net board Mini slot DNC2 board To other device Built–in I/O I/O for operator’s I/O Link panel IOLINK(JD1A) JD1B JD1A DI:96 points DO:64 points I/O Link β DI/DO–1
- Page 21B–63833EN/03 2. TOTAL CONNECTION DIAGRAM Total connection diagram for Series 0i Mate Main board 24V–IN(CP1) Power supply 24VDC 24V–OUT(CP2) To I/O device LCD unit LCD/MDI unit Optical fiber cable DISPLAY(COP20A) COP20B MDI unit 24VDC CP1A CK2 CP1B CA55 CK1 CRT/MDI unit CRT unit CRT(JA1) CN1 MDI unit
- Page 222. TOTAL CONNECTION DIAGRAM B–63833EN/03 Main board I/O for operator’s panel I/O Link (with MPG) IOLINK(JD1A) JD1B JA3 Manual pulse generator JD1A (up to 3 units) I/O for operator’s panel (without MPG) JD1B JD1A I/O Link β servo amplifier (For the 0i Mate, only one unit can be connected.) 8
- Page 23B–63833EN/03 3. INSTALLATION 3 INSTALLATION 9
- Page 243. INSTALLATION B–63833EN/03 3.1 ENVIRONMENT FOR INSTALLATION 3.1.1 The peripheral units and the control unit have been designed on the Environmental assumption that they are housed in closed cabinets. In this manual “cabinet” refers to the following: Requirements Outside D Cabinet manufactured by t
- Page 25B–63833EN/03 3. INSTALLATION 3.2 POWER SUPPLY 3.2.1 The following units related to the CNC control unit require input power Power Supply for CNC of 24 VDC ±10%. Control Units Table 3.2.1 Power supply f indicates ”Applicable.” Series Series Power Unit 0i 0i Mate supply Control unit 1–slot — f 1.6A 2–
- Page 263. INSTALLATION B–63833EN/03 3.3 When a cabinet is designed, it must satisfy the environmental conditions described in Sec. 3.1. In addition, the magnetic interference on the CRT DESIGN AND screen, noise resistance, and maintenance requirements must be INSTALLATION considered. The cabinet design mus
- Page 27B–63833EN/03 3. INSTALLATION (9) The CRT screen can be distorted by magnetic interference. Arranging magnetic sources must be done with care. If magnetic sources (such as transformers, fan motors, electromagnetic contactors, solenoids, and relays) are located near the CRT display, they frequently di
- Page 283. INSTALLATION B–63833EN/03 3.4 The purpose of the thermal design of the cabinet is to limit the difference in temperature between the air in the cabinet and the outside air to 10°C THERMAL DESIGN OF or less when the temperature in the cabinet increases. THE CABINET The internal air temperature of
- Page 29B–63833EN/03 3. INSTALLATION 3.4.3 Heat Loss of Each Unit f indicates ”Applicable.” Series Series Heat Unit 0i 0i Mate loss Control unit 1–slot — f 30W 2–slot (without data server) f — 50W 2–slot (with data server) f — 60W Option card Ethernet card f — 10W for mini slot HSSB card f — 3W DNC2 card f
- Page 303. INSTALLATION B–63833EN/03 3.5 The CNC has been steadily reduced in size using surface–mount and custom LSI technologies for electronic components. The CNC also is ACTION AGAINST designed to be protected from external noise. However, it is difficult to NOISE measure the level and frequency of nois
- Page 31B–63833EN/03 3. INSTALLATION Group Signal line Action Cable for position and velocity Bind the cables in group C sepa- feedback rately from group A, or cover group C with an electromagnet- Cable between the CNC and ic shield. spindle amplifier Separate group C as far from Group B as possible. Cable
- Page 323. INSTALLATION B–63833EN/03 3.5.2 The following ground systems are provided for the CNC machine tool: Ground (1) Signal ground system (SG) The signal ground (SG) supplies the reference voltage (0 V) of the electrical signal system. (2) Frame ground system (FG) The frame ground system (FG) is used f
- Page 33B–63833EN/03 3. INSTALLATION 3.5.3 Connecting the Signal Ground (SG) of the Series 0i control unit Control Unit M3 (screw hole) Ground cable (upper 2mm2) M4 (screw hole) Ground plate of PE the cabinet Connect the 0 V line of the electronic circuit in the control unit with the ground plate of the cab
- Page 343. INSTALLATION B–63833EN/03 Series 0i Mate control unit M3 (screw hole) M4 (screw hole) Ground cable (upper 2mm2) Ground plate of PE the cabinet Connect the 0 V line of the electronic circuit in the control unit with the ground plate of the cabinet via the signal ground (SG) terminal. The SG termin
- Page 35B–63833EN/03 3. INSTALLATION MDI CRT Approx. 15mm M4 stud Approx. 20 mm (for 9″ CRT/MDI unit) 9″ CRT/MDI unit Approx. 150 mm (for 8.4″ LCD/MDI unit) 8.4″ LCD/MDI unit MDI LCD M4 stud Approx. 17mm Approx. 151mm 7.2″ LCD/MDI unit LCD LCD M4 stud M4 stud Approx. 17mm Approx. 20mm Approx. 37mm 7.2″ LCD
- Page 363. INSTALLATION B–63833EN/03 Approx. 17mm M3 screw hole Approx. 60mm 8.4″ LCD unit M4 stud Approx. 17mm Stand–alone type MDI unit (small) Approx. 32mm M4 stud Approx. 30mm Stand–alone type MDI unit (Full–key for 10.4″ LCD) Approx. 25mm MDI M4 stud Approx. 24mm All the figures above are those in whic
- Page 37B–63833EN/03 3. INSTALLATION 3.5.4 The AC/DC solenoid and relay are used in the power magnetics cabinet. Noise Suppressor A high pulse voltage is caused by coil inductance when these devices are turned on or off. This pulse voltage induced through the cable causes the electronic circuits to be distu
- Page 383. INSTALLATION B–63833EN/03 3.5.5 The CNC cables that require shielding should be clamped by the method Cable Clamp and shown below. This cable clamp treatment is for both cable support and proper grounding of the shield. To insure stable CNC system operation, Shield Processing follow this cable cl
- Page 39B–63833EN/03 3. INSTALLATION ÇÇ Machine side installation ÇÇ board ÇÇ Control unit ÇÇ ÇÇ ÇÇ ÇÇ ÇÇ ÇÇ ÇÇ ÇÇ Ground plate ÇÇ ÇÇ ÇÇ Metal fittings ÇÇ ÇÇ for clamp ÇÇ Shield cover Fig.3.5.5(b) Cable clamp (2) Prepare ground plate like the following figure. Ground terminal (grounded) Hole for securing me
- Page 403. INSTALLATION B–63833EN/03 Ground 8mm plate 12mm 20mm Fig.3.5.5(d) Ground plate holes (Reference) Outer drawings of metal fittings for clamp. Max. 55mm 28mm 6mm 17mm Fig.3.5.5(e) Outer drawings of metal fittings for clamp Ordering specification for metal fittings for clamp A02B–0124–K001 (8 pieces
- Page 41B–63833EN/03 3. INSTALLATION 3.6 CONTROL UNIT 3.6.1 The control unit is equipped with a fan motor. Installing the Control Air is fed into the bottom of the unit and output from the fan motor Unit mounted on the top of the unit. The spaces shown in Fig. 3.6.1 (areas (A) and (B)) are always required t
- Page 423. INSTALLATION B–63833EN/03 3.7 Fig. 3.7 (a) shows the grid of connector location. Control board may not have all connectors as shown in Fig. 3.7 (a). CABLE LEAD–IN For actual connector layout of each board, please see the connector layout DIAGRAM diagrams in Fig. 3.8 (a) or later. 0i–B 0i Mate–B M
- Page 43B–63833EN/03 3. INSTALLATION Unit : mm Fig.3.7 (b) Cable installation 29
- Page 443. INSTALLATION B–63833EN/03 3.8 CONNECTOR LAYOUT DIAGRAM Memory back up LED for display of battery status/alarm (4.4) Data server Ethernet Memory card slot connector (13) I/O device (RS232C) Analog spindle connector connector (5.3) (6.2) High–speed skip connector Serial spindle (5.5) connector (6.1
- Page 45B–63833EN/03 3. INSTALLATION Memory back up battery (4.4) Memory card slot LED for display of status/alarm I/O device (RS232C) connector Analog spindle (5.3) connector (6.2) High–speed skip connector Serial spindle (5.5) connector (6.1) Position coder connector MDI connector (for analog spindles) (f
- Page 463. INSTALLATION B–63833EN/03 Printed–circuit boards for mini slots (1/2) Ethernet board Ethernet board connector (13) DeviceNet board DeviceNet board connector (13) PROFIBUS board PROFIBUS board connector (13) FL–net board FL–net board connector (13) Fig.3.8 (c) NOTE The numbers in parentheses () in
- Page 47B–63833EN/03 3. INSTALLATION Printed–circuit boards for mini slots (2/2) HSSB board HSSB optical connector (11) DNC2 board RS–232–C connector (12) Fig.3.8 (d) NOTE The numbers in parentheses () in the figures are keyed to the item numbers of the descriptions in this manual. The numbers in brackets [
- Page 484. POWER SUPPLY CONNECTION B–63833EN/03 4 POWER SUPPLY CONNECTION 34
- Page 49B–63833EN/03 4. POWER SUPPLY CONNECTION 4.1 This section explains the connection of power supply for Series 0i/Series 0i Mate control unit. GENERAL 35
- Page 504. POWER SUPPLY CONNECTION B–63833EN/03 4.2 TURNING ON AND OFF THE POWER TO THE CONTROL UNIT 4.2.1 Supply power (24VDC) to the control uint of Series 0i/Series 0i Mate from an external sources. Power Supply for the Control Unit Provide ON/OFF circuit A for turning the AC power on and off on the inpu
- Page 51B–63833EN/03 4. POWER SUPPLY CONNECTION 4.2.2 Specifications of recommended external 24 VDC power supply External 24 VDC Power (regulated power supply): (The power supply must satisfy UL1950.) Supply and Circuit Output voltage: +24 V (10% (21.6 V to 26.4 V) (including ripple voltage and noise. See t
- Page 524. POWER SUPPLY CONNECTION B–63833EN/03 S Notes to take when the When the vertical axis exists, select the DC power supply that has a long voltage vertical axis exists hold time to decrease the amount of vertical axis falling during power–off (including a power failure). If the operating voltage dro
- Page 53B–63833EN/03 4. POWER SUPPLY CONNECTION Example 2 Regulated AC input power CNC unit supply Device with large rush current For a circuit configuration in example 2, connect another regulated power supply to be specifically used for the device with remarkable load fluctuations so that the CNC and othe
- Page 544. POWER SUPPLY CONNECTION B–63833EN/03 The following circuit configuration is recommended. The power to the CNC and other units (A unit with I/O Link, FANUC Servo Unit (Series with an I/O link (β amplifier with an I/O link), and so on in the sample configuration below)) is assumed to be turned on a
- Page 55B–63833EN/03 4. POWER SUPPLY CONNECTION 4.2.3 Turn on the power to each unit in the following order or all at the same Procedure for Turning time. On the Power 1. Power to the overall machine (200 VAC) 2. Servo amplifier control power supply (200 VAC) 3. Power to the slave I/O units connected via th
- Page 564. POWER SUPPLY CONNECTION B–63833EN/03 4.2.4 Turn off the power to each unit in the following order or all at the same Procedure for Turning time. Off the Power 1. Power to the slave I/O units connected via the I/O link, power to the display unit (24VDC), the CNC control unit (24 VDC), and power to
- Page 57B–63833EN/03 4. POWER SUPPLY CONNECTION 4.3 Supply power to the control unit from external resouce. CABLE FOR Series 0i/0i Mate control unit External power POWER SUPPLY TO CONTROL UNIT CP1 1 +24V 24VDC stabilized 2 0V power 3 24VDC "10% Cable CP1 AMP Japan 1–178288–3 (housing) 1–175218–5 (Contact) E
- Page 584. POWER SUPPLY CONNECTION B–63833EN/03 4.4 BATTERY 4.4.1 Part programs, offset data, and system parameters are stored in CMOS Battery for Memory memory in the control unit. The power to the CMOS memory is backed up by a lithium battery mounted on the front panel of the control unit. The Backup (3VD
- Page 59B–63833EN/03 4. POWER SUPPLY CONNECTION Claw holding the battery Battery connector Lithium battery 4 Remove the battery from the front panel of the control unit. First detach the connector, then remove the battery from the battery case. 5 Replace the battery and then reconnect the connector. CAUTION
- Page 604. POWER SUPPLY CONNECTION B–63833EN/03 4.4.2 If the voltage of a battery drops, the screen on the LCD flashes. (If a fan Batteries for CNC alarm is issued, the screen on the LCD also flashes.) If this status occurs, replace the battery as soon as possible (within 1 week). FANUC Display Unit with PC
- Page 61B–63833EN/03 4. POWER SUPPLY CONNECTION Battery holder Lithium battery A02B–0200–K102 Connector (BAT1) Fig.4.4.2 Battery replacement 4.4.3 One battery unit can maintain current position data for six absolute pulse coders for a year. Battery for Separate When the voltage of the battery becomes low, A
- Page 624. POWER SUPPLY CONNECTION B–63833EN/03 Replacing batteries Obtain four commercially available alkaline batteries (size D). (1) Turn on the power to the machine (Series 0i/0i Mate). (2) Loosen the screws of the battery case, and remove the cover. (3) Replace the dry batteries in the case. Note the p
- Page 63B–63833EN/03 5. CONNECTION TO CNC PERIPHERALS 5 CONNECTION TO CNC PERIPHERALS 49
- Page 645. CONNECTION TO CNC PERIPHERALS B–63833EN/03 5.1 CONNECTION TO THE DISPLAY UNIT/ MDI UNIT 5.1.1 The following display units can be connected to the Series 0i/0i Mate. Outline Prepared by machine tool builders Shipped with cables included with the unit Shipped with wiring installed by FANUC For 9”CR
- Page 65B–63833EN/03 5. CONNECTION TO CNC PERIPHERALS For Display unit with PC functions (Series 0i only) See Chapter 14 for details of connection. CNC Display unit with PC HSSB functions 24VDC board (option) Soft key JA2 MDI unit CNC Display unit with PC HSSB functions 24VDC board (option) JA2 FA full keyb
- Page 665. CONNECTION TO CNC PERIPHERALS B–63833EN/03 5.1.2 9″ CRT Display Unit Interface Series 0i/0i Mate CRT unit JA1 CN1 (PCR–EV20MDT) (MR–20RM) 01 VDR 11 1 VDR 14 8 0V 02 0V 12 VSYNC 2 HSYNC 15 9 0V 03 VDG 13 3 VSYNC 16 10 0V 04 0V 14 0V 4 VDG 17 (0V) 11 0V 05 VDB 15 5 VDB 18 (0V) 12 0V 06 0V 16 0V 6 1
- Page 67B–63833EN/03 5. CONNECTION TO CNC PERIPHERALS 5.1.3 Various LCD Units Interface D Connection between the An optical fiber cable is used to make the connection between the CNC CNC control unit and control unit and LCD unit. For details of the optical fiber cable, see LCD unit Appendix D. D Connection
- Page 685. CONNECTION TO CNC PERIPHERALS B–63833EN/03 5.1.4 Connection to the Standard MDI Unit Series 0i control unit MDI unit JA2 CK1 01 :KEY00 11 :KEY01 01 :KEY00 11 :KEY01 02 :KEY02 12 :KEY03 02 :KEY02 12 :KEY03 03 :KEY04 13 :KEY05 03 :KEY04 13 :KEY05 04 :KEY06 14 :KEY07 04 :KEY06 14 :KEY07 05 :COM00 15
- Page 69B–63833EN/03 5. CONNECTION TO CNC PERIPHERALS 5.1.5 Connection to the MDI Unit (When a LCD Unit is Used) Honda Tsushin Kogyo Co., Ltd. LCD unit PCR–E20FA (Contact: Crimp type) MDI unit PCR–E20FS (Contact: Soldering type) PCR–V20LA (Housing) CA55 CK1 JAE LY20–20P–DTI–P PCR–E20MDK–SL–A P A B 1 *KEY00
- Page 705. CONNECTION TO CNC PERIPHERALS B–63833EN/03 5.2 VARIED MDI KEY SWITCH D 9″CRT/MDI unit (T series) D 7.2″LCD/MDI unit (T series) D 8.4″LCD/MDI unit (T series) D Stand–alone type small MDI unit (T series) English display Symbol display 56
- Page 71B–63833EN/03 5. CONNECTION TO CNC PERIPHERALS English and symbol display 57
- Page 725. CONNECTION TO CNC PERIPHERALS B–63833EN/03 D 9″CRT/MDI unit (M series) D 7.2″LCD/MDI unit (M series) D 8.4″LCD/MDI unit (M series) D Stand–alone type small MDI unit (M series) English display Symbol display 58
- Page 73B–63833EN/03 5. CONNECTION TO CNC PERIPHERALS English and symbol display 59
- Page 745. CONNECTION TO CNC PERIPHERALS B–63833EN/03 D Stand–alone type full–key MDI unit (T series) English display Symbol display 60
- Page 75B–63833EN/03 5. CONNECTION TO CNC PERIPHERALS English and symbol display 61
- Page 765. CONNECTION TO CNC PERIPHERALS B–63833EN/03 D Stand–alone type full–key MDI unit (M series) English display Symbol display 62
- Page 77B–63833EN/03 5. CONNECTION TO CNC PERIPHERALS English and symbol display 63
- Page 785. CONNECTION TO CNC PERIPHERALS B–63833EN/03 5.3 CONNECTING I/O DEVICES 5.3.1 I/O devices are used for inputting various data such as CNC programs and General parameters from external devices to the CNC or outputting data from the CNC to external devices. The Handy File is one of the I/O devices fo
- Page 79B–63833EN/03 5. CONNECTION TO CNC PERIPHERALS 5.3.2 Connecting I/O Devices Series 0i Mate Series 0i control unit control unit Punch panel R232–1 JD5A R232–2 JD5B Handy File 65
- Page 805. CONNECTION TO CNC PERIPHERALS B–63833EN/03 5.3.3 RS–232–C Serial Port CNC RELAYING CONNECTOR JD5A, JD5B (DBM–25S) (PCR–EV20MDT) 1 FG 14 1 RD 11 SD 2 SD 15 2 0V 12 0V 3 RD 16 3 DR 13 ER 4 RS 17 4 0V 14 0V 5 CS 18 5 CS 15 RS 6 DR 19 6 0V 16 0V 7 SG 20 ER 7 CD 17 8 CD 21 8 0V 18 9 22 9 19 +24V 10 23
- Page 81B–63833EN/03 5. CONNECTION TO CNC PERIPHERALS 5.3.4 RS–232–C Interface Specification RS–232–C Interface Generally signals as follows are used in RS–232–C interface. signals CNC Output SD (Send data) Input RD (Recieve data) RS (Request to Send) When CS is not used short CS and RS. CS (Enable to send)
- Page 825. CONNECTION TO CNC PERIPHERALS B–63833EN/03 Signal description of RS–232–C Signal RS–232–C interface name circuit I/O Description number SD 103 Out- Sending Start bit Stop bit put data RD 104 Input Receiv- ON 1 2 3 4 5 6 7 8 OFF ing (When ISO code “0” is sent) data RS 105 Input Sending This signal
- Page 83B–63833EN/03 5. CONNECTION TO CNC PERIPHERALS Transmission Method of RS–232–C interface Start–stop Generally, two transmission methods are available at the serial interface. Series 0i use the start–stop method. With this method, start and stop signals are output before and after each data bit. One c
- Page 845. CONNECTION TO CNC PERIPHERALS B–63833EN/03 Table 5.3.4 ISO code EIA code Meaning Character 8 7 6 5 4 3 2 1 Character 8 7 6 5 4 3 2 1 0 f f F 0 f F Numeral 0 1 f f f F f 1 F f Numeral 1 2 f f f F f 2 F f Numeral 2 3 f f F f f 3 f F f f Numeral 3 4 f f f F f 4 F f Numeral 4 5 f f F f f 5 f F f f Nu
- Page 85B–63833EN/03 5. CONNECTION TO CNC PERIPHERALS NOTE 1 When the external device is equipped with an ISO/EIA converter, the following items must be noted in Table 5.3.4. Control out (Comment field start) Control in (Comment field end) EIA code (.......................) CR o .................... Conditi
- Page 865. CONNECTION TO CNC PERIPHERALS B–63833EN/03 (iv) Cable length The cable length depends on the external device type. Consult with the device manufacturers for actual connecting cable lengths. When cable A (A66L–0001–0041) is used, cable length is as follows by the specification of NC. for RS–232–C
- Page 87B–63833EN/03 5. CONNECTION TO CNC PERIPHERALS Time chart when the NC (1) NC output DC2. send data (Punch out) (2) NC outputs punch data in succession. (3) When data processing is delayed at the external device. (a) Data output stops within two characters including a currently transmitting character
- Page 885. CONNECTION TO CNC PERIPHERALS B–63833EN/03 Connection between RS–232–C interface and I/O devices CNC I/O device side SD SD RD RD RS RS CS CS ER ER DR DR CD CD SG SG 0V FG FG 74
- Page 89B–63833EN/03 5. CONNECTION TO CNC PERIPHERALS 5.3.5 FANUC Handy File Connection Cable side connector Connector: DBM–25P (Japan Aviation Elec- tronic Inc., Ltd.) CNC Cover: DB–C2–J9 (Japan Aviation Electronic Inc., Ltd.) JD5A, JD5B (PCR–EV20MDT) Relaying 1 RD 11 SD cable FANUC 2 0V 12 0V Handy File 3
- Page 905. CONNECTION TO CNC PERIPHERALS B–63833EN/03 5.4 CONNECTING THE MANUAL PULSE GENERATOR 5.4.1 Manual pulse generators are used to manually move an axis in the handle General feed mode. This subsection describes manual pulse generators for the Series 0i. See Section 9.5 for the Series 0i Mate. Series
- Page 91B–63833EN/03 5. CONNECTION TO CNC PERIPHERALS 5.4.2 Connection to Manual Pulse Generators CNC Manual Pulse Generator I/O PCB Manual Pulse Generator unit #1 JA3B (PCR–EV20MDT) (M3 screw terminal) 1 HA1 11 0V 3 4 5 6 2 HB1 12 0V +5V 0V HA1 HB1 3 HA2 13 0V Manual Pulse Generator unit #2 4 HB2 14 0V (M3
- Page 925. CONNECTION TO CNC PERIPHERALS B–63833EN/03 5.4.3 Manual pulse generators are supplied with 5 VDC power the same as Cable Length When pulse coders. The drop in voltage due to cable resistance must not exceed 0.2V (on 0V and 5V lines in total). Manual Pulse Generator is Used 0.1 R 2L where 0.1 :Pow
- Page 93B–63833EN/03 5. CONNECTION TO CNC PERIPHERALS Connection example Connection example in which more than one unit equipped with a manual handle interface is connected with an I/O LINK Manual pulse Manual pulse Built–in I/O generator generator (No. 1) (No. 2) Operator’s JA3 panel I/O Manual pulse JD1B
- Page 945. CONNECTION TO CNC PERIPHERALS B–63833EN/03 5.5 CONNECTING THE HIGH–SPEED SKIP (HDI) 5.5.1 General Series 0i Mate Series 0i control unit control unit High–speed skip (HDI) JA40 Switch 80
- Page 95B–63833EN/03 5. CONNECTION TO CNC PERIPHERALS 5.5.2 Connection to the CNC High–speed Skip (HDI) JA40 PCR–EV20MDT 1 HDI0 11 2 0V 12 3 13 4 14 5 (ES)0V 15 6 16 7 (SVC) 17 8 (ENB1) 18 9 (ENB2) 19 10 20 Signals inside ( ) are used with the analog spindle. NOTE Leave connector pins unconnected if they ar
- Page 965. CONNECTION TO CNC PERIPHERALS B–63833EN/03 5.5.3 Input Signal Rules for the High–speed Skip (HDI) Circuit configuration CNC liL/liH FILTER RECEIVER DRIVER VH/VL SHIELD 0V Absolute maximum rating Input voltage range Vin: –3.6 to +13.6 V Input characteristics Unit Symbol Specification Unit Remark H
- Page 97B–63833EN/03 6. SPINDLE CONNECTION 6 SPINDLE CONNECTION The figure below shows the spindle–related connections. Note that the number of connectable spindles depends on the model. So, see the tables that follow the figure below. First serial spindle Position coder JA7B SPM JA7A JA7A TB2 Spindle motor
- Page 986. SPINDLE CONNECTION B–63833EN/03 6.1 SERIAL SPINDLE 6.1.1 Connection of One to Two Serial Spindles CNC Spindle amplifier module JA7A JA7B PCR–EV20MDT (PCR–E20MDT) 1 SIN 11 1 SIN 11 0V 2 *SIN 12 0V 2 *SIN 12 0V 3 SOUT 13 3 SOUT 13 0V 4 *SOUT 14 0V 4 *SOUT 14 0V 5 [ ] 15 [ ] 5 15 0V 6 [ ] 16 0V 6 16
- Page 99B–63833EN/03 6. SPINDLE CONNECTION Cable connection Connector JA7A Connector JA7B 3 1 SOUT SIN *SOUT 4 2 *SIN CNC SIN 1 3 SOUT Spindle amplifier *SIN 2 4 *SOUT module 12,14,16 12,14,16 Ground plate Ground plate Recommended cable connector: PCR–E20FA (manufactured by Honda Tsushin Kogyo) FCN–247J020–
- Page 1006. SPINDLE CONNECTION B–63833EN/03 6.2 ANALOG SPINDLE CNC INTERFACE Signal Name Description SVC, ES Spindle command voltage JA7A and common line PCR–EV20MDT ENB1, ENB2 Spindle enable signal (Note 1) 1 ( ) 11 ( ) 2 (0V) 12 3 ( ) 13 ( ) 4 14 5 ES 15 ( ) 6 ( ) 16 7 SVC 17 ( ) 8 ENB1 18 9 ENB2 19 ( ) 10
- Page 101B–63833EN/03 6. SPINDLE CONNECTION 6.3 POSITION CODER CNC INTERFACE Signal Name Description JA41 SC, :SC Position coder phase C signals PCR–E20MDT PA, :PA Position coder phase A signals 1 ( ) 11 PB, :PB Position coder phase A signals 2 ( ) 12 0V 3 ( ) 13 SOUT, :SOUT Serial spindle signals (Note) 4 (
- Page 1027. SERVO INTERFACE B–63833EN/03 7 SERVO INTERFACE 88
- Page 103B–63833EN/03 7. SERVO INTERFACE 7.1 CONNECTION TO THE SERVO AMPLIFIERS Series 0i Mate Series 0i control unit control unit Servo amplifier FSSB COP10A 89
- Page 1047. SERVO INTERFACE B–63833EN/03 7.1.1 This chapter describes how to connect the servo units to the Series 0i/0i General Mate. For details of the connection of the Servo amplifier, refer to the each servo amplifier manual. 7.1.2 Interface to the Servo Control unit Amplifiers Servo amplifier modules C
- Page 105B–63833EN/03 7. SERVO INTERFACE 7.1.3 Separate Detector Interface Servo amplifier module Separate detector in- terface unit CP11A Control unit or the previous–stage servo amplifier module Linear scale 91
- Page 1067. SERVO INTERFACE B–63833EN/03 CNC Servo amplifier module Servo card Ô Optical fiber cable ÔÔ Ô ÔÔ COP10A COP10B ÔÔ COP10A ÔÔ ÔÔ ÔÔ COP10B COP10A ÔÔ | | | ÔÔ COP10B ÔÔ Optical fiber cable COP10A Up to 2 axes with Series 0i Mate–TB Up to 3 axes with Series 0i Mate–MB Up to 4 axes with Series 0i–TB/M
- Page 107B–63833EN/03 7. SERVO INTERFACE 7.1.4 The interface unit can feed 0.35 A (5 V) to each separate detector. Separate Detector Item Specification Interface Unit Power supply capacity Voltage 24 VDC ±10% Specification Current 0.9 A (basic unit only) 1.5 A (basic unit + expansion unit) Ordering informati
- Page 1087. SERVO INTERFACE B–63833EN/03 7.1.6 Linear Scale Interface Separate detector interface unit (Parallel Interface) JF101 to JF104 Linear scale (PCR–EV20MDT) 1 PCA 11 2 *PCA 12 0V 3 PCB 13 4 *PCB 14 0V 5 PCZ 15 6 *PCZ 16 0V 7 (+6V) 17 +6V and REQ are for separate absolute pulse coders. 8 (REQ) 18 +5V
- Page 109B–63833EN/03 7. SERVO INTERFACE 7.1.7 Stand–alone Type Separate detector interface unit Pulse Coder Interface JF101 to JF104 Separate detector (PCR–EV20MDT) (Parallel Interface) 1 PCA 11 Pulse coder D For absolute detector 2 *PCA 12 0V (MS3102A–22–14P) 3 PCB 13 A PCA B *PCA C PCB D *PCB 4 *PCB 14 0V
- Page 1107. SERVO INTERFACE B–63833EN/03 (Parallel interface) D For incremental detector Separate detector interface unit Separate detector JF101 to JF104 Pulse coder (PCR–EV20MDT) (MS3102A–20–29P) 1 PCA 11 2 *PCA 12 0V 3 PCB 13 A PCA B PCB C +5V D *PCA 4 *PCB 14 0V E *PCB F PCZ G *PCZ H SHLD 5 PCZ 15 J +5V
- Page 111B–63833EN/03 7. SERVO INTERFACE Connection to a detector Separate detector interface unit Detector made by another made by another manufacturer manufacturer (Serial JF101 to JF108 interface) (PCR–EV20MDT) 1 SD 11 2 *SD 12 0V 3 13 4 14 0V 5 REQ 15 6 *REQ 16 0V 7 +6V 17 8 18 +5V The +6V signal is for
- Page 1127. SERVO INTERFACE B–63833EN/03 (Serial interface) Separate detector interface unit Separate detector JF101 to JF104 Pulse coder (PCR–EV20MDT) 1 SD 11 A SD B C D :SD 2 :SD 12 0V E F REQ G REQ H SHLD 3 13 J +5V K +5V L M 4 14 0V N 0V P R +6VA S 0VA 5 REQ 15 T 0V 6 :REQ 16 0V 7 +6V 17 8 18 +5V MS3106B
- Page 113B–63833EN/03 7. SERVO INTERFACE 7.1.8 The standard of the feedback signal from the additional detector is as Input Signal shown below. Requirements (1) A and B phase signal input This is a method to input position information by the mutual 90 degree phase slip of A and B phase signals. Detection of
- Page 1147. SERVO INTERFACE B–63833EN/03 Time requirements Requirements for the signals at the input pins of input connectors JF101 to JF104. TD y 0.15 µsec The signals for these connectors are differential input signals with A and B phases. An important factor is time TD from point A, when the potential dif
- Page 115B–63833EN/03 7. SERVO INTERFACE 7.1.9 Connection of Battery for Separate Absolute Detector Separate detector interface unit Absolute pulse coder battery case 101
- Page 1167. SERVO INTERFACE B–63833EN/03 Separate detector interface unit Battery case JA4A (PCR–EV20MDT) 01 11 (M3 terminal) 02 12 + – 03 0V 13 +6V 0V 04 14 05 15 06 16 07 +6V 17 08 18 09 19 10 20 CABLE CONNECTION JA4A Battery case +6V 7 + +6V 0V 3 – 0V RECOMMENDED CABLE MATERIAL: y0.2 mm2 (7/0.18) Recommen
- Page 117B–63833EN/03 7. SERVO INTERFACE 7.1.10 Connector locations on the basic unit Connector Locations For the outside dimensions, see Appendix A. 103
- Page 1187. SERVO INTERFACE B–63833EN/03 7.1.11 1) Notes on installation Installation (1) Use an interface unit in a completely enclosed cabinet. (2) Install an interface unit on a vertical surface, and provide a space of 100 mm above and below the unit. Below an interface unit, do not place equipment that g
- Page 119B–63833EN/03 7. SERVO INTERFACE 7.1.12 Notes on Installing a Separate Detector CAUTION To install/remove the unit, a screwdriver must be inserted Interface Unit obliquely. So, sufficient access clearances are required on both sides of the unit. As a guideline, if the front of an adjacent unit appear
- Page 1207. SERVO INTERFACE B–63833EN/03 Installing the unit on the DIN rail Installing the unit on the DIN rail DIN rail Removing the unit from the DIN rail DIN rail Installing the unit: 1. Hook the unit on the top of the DIN rail. 2. Push the unit in until it clicks. Removing the unit: 1. Push down the loc
- Page 121B–63833EN/03 8. CONNECTING MACHINE INTERFACE I/O 8 CONNECTING MACHINE INTERFACE I/O 107
- Page 1228. CONNECTING MACHINE INTERFACE I/O B–63833EN/03 8.1 The Series 0i has a built–in I/O board for machine interface I/O. Number of DI/DO points for built–in I/O card are 96/64 points. This built–in I/O GENERAL board must be assigned as the first slave of the I/O Link with the PMC ladder according to t
- Page 123B–63833EN/03 8. CONNECTING MACHINE INTERFACE I/O 8.2 The following cautions must be observed when using I/O signal receivers and drivers for the machine interface. CAUTIONS 8.2.1 DI signals are basically of the sink type (a type that drains energy). Some DI Signals and DI signals, however, can be se
- Page 1248. CONNECTING MACHINE INTERFACE I/O B–63833EN/03 8.3 BUILT–IN I/O CARD CONNECTION Series 0i Machine Operator’s panel control unit Magnetic cabinet circuit 110
- Page 125B–63833EN/03 8. CONNECTING MACHINE INTERFACE I/O 8.3.1 Connector Pin Arrangement CB104 CB105 CB106 CB107 HIROSE 50PIN HIROSE 50PIN HIROSE 50PIN HIROSE 50PIN A B A B A B A B 01 0V +24V 01 0V +24V 01 0V +24V 01 0V +24V 02 X0000.0 X0000.1 02 X0003.0 X0003.1 02 X0004.0 X0004.1 02 X0007.0 X0007.1 03 X000
- Page 1268. CONNECTING MACHINE INTERFACE I/O B–63833EN/03 8.3.2 Connecting DI/DO For example, connecting DI Terminal No. Address No. Bit No. +24V CB104(B01) X0000.0 CB104(A02) RV X0000.1 CB104(B02) RV X0000.2 CB104(A03) RV X0000.3 CB104(B03) RV X0000.4 CB104(A04) RV X0000.5 CB104(B04) RV X0000.6 CB104(A05) R
- Page 127B–63833EN/03 8. CONNECTING MACHINE INTERFACE I/O Terminal No. Address No. Bit No. +24V CB104(B01),CB105(B01) X0002.0 CB104(A10) RV X0002.1 CB104(B10) RV X0002.2 CB104(A11) RV X0002.3 CB104(B11) RV X0002.4 CB104(A12) RV X0002.5 CB104(B12) RV X0002.6 CB104(A13) RV X0002.7 CB104(B13) RV 0V X0003.0 CB10
- Page 1288. CONNECTING MACHINE INTERFACE I/O B–63833EN/03 Terminal No. Address No. Bit No. +24V CB106(B01) X0004.0 CB106(A02) RV X0004.1 CB106(B02) RV X0004.2 CB106(A03) RV X0004.3 CB106(B03) RV X0004.4 CB106(A04) RV X0004.5 CB106(B04) RV X0004.6 CB106(A05) RV X0004.7 CB106(B05) RV COM4 CB106(A14) CB106(A01)
- Page 129B–63833EN/03 8. CONNECTING MACHINE INTERFACE I/O Terminal No. Address No. Bit No. +24V CB106(B01),CB107(B01) X0006.0 CB106(A10) RV X0006.1 CB106(B10) RV X0006.2 CB106(A11) RV X0006.3 CB106(B11) RV X0006.4 CB106(A12) RV X0006.5 CB106(B12) RV X0006.6 CB106(A13) RV X0006.7 CB106(B13) RV 0V X0007.0 CB10
- Page 1308. CONNECTING MACHINE INTERFACE I/O B–63833EN/03 Terminal No. Address No. Bit No. +24V CB105(B01) X0008.0 CB105(A06) RV X0008.1 CB105(B06) RV X0008.2 CB105(A07) RV X0008.3 CB105(B07) RV X0008.4 CB105(A08) RV X0008.5 CB105(B08) RV X0008.6 CB105(A09) RV X0008.7 CB105(B09) RV 0V X0009.0 CB105(A10) RV X
- Page 131B–63833EN/03 8. CONNECTING MACHINE INTERFACE I/O Terminal No. Address No. Bit No. +24V CB107(B01) X0010.0 CB107(A06) RV X0010.1 CB107(B06) RV X0010.2 CB107(A07) RV X0010.3 CB107(B07) RV X0010.4 CB107(A08) RV X0010.5 CB107(B08) RV X0010.6 CB107(A09) RV X0010.7 CB107(B09) RV 0V X0011.0 CB107(A10) RV X
- Page 1328. CONNECTING MACHINE INTERFACE I/O B–63833EN/03 For example, connecting DO Terminal No. Address No. Bit No. CB104(A24,B24,A25,B25) CB105(A24,B24,A25,B25) CB106(A24,B24,A25,B25) DOCOM CB107(A24,B24,A25,B25) +24V 0V +24V stabilized power supply DV Y0000.0 CB104(A16) Relay Y0000.1 CB104(B16) DV Y0000.
- Page 133B–63833EN/03 8. CONNECTING MACHINE INTERFACE I/O Terminal No. Address No. Bit No. CB104(A24,B24,A25,B25) CB105(A24,B24,A25,B25) CB106(A24,B24,A25,B25) DOCOM CB107(A24,B24,A25,B25) +24V 0V +24V stabilized power supply DV Y0002.0 CB105(A16) Relay Y0002.1 CB105(B16) DV Y0002.2 CB105(A17) DV Y0002.3 CB1
- Page 1348. CONNECTING MACHINE INTERFACE I/O B–63833EN/03 Terminal No. Address No. Bit No. CB104(A24,B24,A25,B25) CB105(A24,B24,A25,B25) CB106(A24,B24,A25,B25) DOCOM CB107(A24,B24,A25,B25) +24V 0V +24V stabilized power supply DV Y0004.0 CB106(A16) Relay Y0004.1 CB106(B16) DV Y0004.2 CB106(A17) DV Y0004.3 CB1
- Page 135B–63833EN/03 8. CONNECTING MACHINE INTERFACE I/O Terminal No. Address No. Bit No. CB104(A24,B24,A25,B25) CB105(A24,B24,A25,B25) CB106(A24,B24,A25,B25) DOCOM CB107(A24,B24,A25,B25) +24V 0V +24V stabilized power supply DV Y0006.0 CB107(A16) Relay Y0006.1 CB107(B16) DV Y0006.2 CB107(A17) DV Y0006.3 CB1
- Page 1368. CONNECTING MACHINE INTERFACE I/O B–63833EN/03 8.3.3 I/O Signal Requirements Contact capacity : Requirements and for DI signals 30 VDC 16 mA or more External Power Supply Leakage current between contact points for an open circuit : 1 mA or less (at 26.4 V) for DO Voltage drop between contact point
- Page 137B–63833EN/03 8. CONNECTING MACHINE INTERFACE I/O CAUTION 2 When using a dark lighting resistor as shown in the following figure, use a leakage–proof diode. DOCOM +24V 0V Dark lighting resister DV Lamp Leakage–proof diode 0V 123
- Page 1388. CONNECTING MACHINE INTERFACE I/O B–63833EN/03 NOTE Output signal driver Each of the output signal driver devices used on this I/O board outputs eight signals. A driver device monitors the current of each output signal. If it detects an overcurrent on an output, it turns off the output. Once an ov
- Page 139B–63833EN/03 8. CONNECTING MACHINE INTERFACE I/O DOCOM OHD CONTROL IN#0 OUT#0 LOGIC OCD CONTROL IN#1 OUT#1 LOGIC OCD ⋅ ⋅ ⋅ ⋅ ⋅ ⋅ ⋅ ⋅ ⋅ ⋅ CONTROL IN#7 OUT#7 LOGIC OCD HD : Over –heat detector circuit OCD : Over–current detector circuit 125
- Page 1409. CONNECTION TO FANUC I/O Link B–63833EN/03 9 CONNECTION TO FANUC I/O Link 126
- Page 141B–63833EN/03 9. CONNECTION TO FANUC I/O Link 9.1 The FANUC I/O Link is a serial interface which connects the CNC, cell controller, dispersed I/O, machine operator’s panel, or Power Mate and GENERAL transfers I/O signals (bit data) at high speeds between each device. The FANUC I/O Link regards one de
- Page 1429. CONNECTION TO FANUC I/O Link B–63833EN/03 9.2 The interface connector JD1A exists on the I/O card for the Series 0i or on the main board for the Series 0i Mate. CONNECTION In the I/O Link there are the master station and its slave stations. As the Series 0i/0i Mate control unit, the master is con
- Page 143B–63833EN/03 9. CONNECTION TO FANUC I/O Link Series 0i Mate control unit I/O Link β servo (One unity only) (See Sec. 9.6.) Machine operator’s panel 24VDC (See Sec. 9.4.) I/O module for operator’s panel I/O Link (DI:48 points, DO:32 points) 24VDC (with M.P.G.) (See Sec. 9.5.) I/O module for operator’
- Page 1449. CONNECTION TO FANUC I/O Link B–63833EN/03 The following is an example in which two operator’s panel I/O boards and one machine operator’s panel are used. DI space map DO space map X4 Operator’s panel I/O Y0 Operator’s panel I/O DI 48 points DO 32 points X5 Y1 S Y2 X9 Y3 X10 Reserved Y4 Operator’s
- Page 145B–63833EN/03 9. CONNECTION TO FANUC I/O Link Series 0i control unit I/O Link β servo (Up to 7 units) (See Sec.9.6.) I/O Link Othe units that have an 24VDC I/O Link interface I/O Link Machine operator’s panel (See Sec.9.4.) 24VDC JD1A 131
- Page 1469. CONNECTION TO FANUC I/O Link B–63833EN/03 DI space map DO space map X0 Built–in I/O Y0 Built–in I/O DI 96 points DO 64 points X1 Y1 X2 Y2 X3 Y3 X4 Y4 X5 Y5 X6 Y6 X7 Y7 X8 Y8 External I/O X9 Y9 X10 Y10 X11 Y11 X12 First MPG Y12 X13 Second MPG Y13 X14 Third MPG Y14 X15 DO alarm detection Y15 X16 Ex
- Page 147B–63833EN/03 9. CONNECTION TO FANUC I/O Link 9.2.1 Connection of FANUC I/O Link by Electric Cable Control unit or preceding slave unit JD1A JD1B (PCR–EV20MDT) (PCR–E20LMD) JD1A (PCR–E20LMD) 1 SIN 11 0V JD1B 1 SIN 11 0V 2 :SIN 12 0V 2 :SIN 12 0V 3 SOUT 13 0V 3 SOUT 13 0V Next slave 4 :SOUT 14 0V 4 :S
- Page 1489. CONNECTION TO FANUC I/O Link B–63833EN/03 9.3 Basically, the Series 0i can be connected to any unit that has a FANUC I/O Link slave interface. For the Series 0i Mate, however, only the UNITS THAT CAN BE following units can be connected. Detailed descriptions of each unit are CONNECTED USING given
- Page 149B–63833EN/03 9. CONNECTION TO FANUC I/O Link 9.4 CONNECTION TO MACHINE OPERATOR’S PANEL 9.4.1 This machine operator’s panel is connected with CNC by I/O Link, which Overview is composed with the following 2 operator’s panels. Sub panel B1 Main panel B 135
- Page 1509. CONNECTION TO FANUC I/O Link B–63833EN/03 9.4.2 Total Connection Diagram Machine operator’s panel CNC Main panel B CM68 General–purpose JD1B I/OLink (JD1A) DI/DO CM69 JD1A JA3 MPG MPG Next I/O unit MPG +24V Power CA64(IN) JA58 Pendant type MPG +24V Power CA64(OUT) CM65 Sub panel B1 CM66 Power mag
- Page 151B–63833EN/03 9. CONNECTION TO FANUC I/O Link 9.4.3 Connections 9.4.3.1 Pin assignment CA64 (Power source) CA65 (Power magnetic cabinet) 3 2 0V 1 +24V A01 EON B01 EOFF 6 5 0V 4 +24V A02 COM1 B02 COM2 Recommended connector for cable: A03 *ESP B03 ESPCM1 Housing: AMP 1–178288–3 (3 pins type) A04 TR1 B0
- Page 1529. CONNECTION TO FANUC I/O Link B–63833EN/03 JA3 (Manual pulse generator) JA58 (Pendant type manual pulse generator) 1 HA1 11 1 HA1 11 Xm+1.5 2 HB1 12 0V 2 HB1 12 0V 3 HA2 13 3 Xm+2.2 13 Xm+1.6 4 HB2 14 0V 4 Xm+2.3 14 0V 5 HA3 15 5 Xm+2.4 15 Xm+1.7 6 HB3 16 0V 6 Xm+2.5 16 0V 7 17 7 Yn+5.3 17 Xm+2.0
- Page 153B–63833EN/03 9. CONNECTION TO FANUC I/O Link 9.4.3.2 To the connector CA64 (IN), shown in the figure below, supply the power Power supply necessary for this operator’s panel to operate and the power necessary for general–purpose DI. To facilitate power branching, the powers supplied connection to CA
- Page 1549. CONNECTION TO FANUC I/O Link B–63833EN/03 9.4.3.3 I/O link connection Control unit preceding slave unit Main panel B JD1A JD1B (PCR–E20MDK–SL–A) (PCR–E20MDK–SL–A) JD1A 1 SIN 11 0V JD1B 1 SIN 11 0V 2 :SIN 12 0V 2 :SIN 12 0V 3 SOUT 13 0V 3 SOUT 13 0V Next slave 4 :SOUT 14 0V 4 :SOUT 14 0V unit 5 15
- Page 155B–63833EN/03 9. CONNECTION TO FANUC I/O Link 9.4.3.4 A signal generated by the emergency stop switch on the machine Emergency stop signal operator’s panel can be sent to the power magnetic cabinet. (This signal cannot be sent to the FANUC I/O Link.) connection When MTB uses the Sub panel B1, wiring
- Page 1569. CONNECTION TO FANUC I/O Link B–63833EN/03 9.4.3.6 DI (input signal) connection Pin number +24V CM68(A1),CM69(A1), Address number JA58(10),JA58(19) Bit Sub panel B1 CM65(A04) D Rotary switch CM65(B05) A (SA1) Xm+0.0 RV Xm+0.1 CM65(A03) F RV Xm+0.2 CM65(A05) B RV Xm+0.3 CM65(B03) E RV Xm+0.4 CM65(B
- Page 157B–63833EN/03 9. CONNECTION TO FANUC I/O Link Address number Pin number +24V Bit JA58(17) Xm+2.0 CM68(A03) RV JA58(8) Xm+2.1 CM68(B03) RV JA58(3) Xm+2.2 CM68(A04) RV JA58(4) Xm+2.3 CM68(B04) RV JA58(5) Xm+2.4 CM68(A05) RV JA58(6) Xm+2.5 CM68(B05) RV Xm+2.6 CM69(B01) RV Xm+2.7 CM69(A02) RV 0V Xm+3.0 C
- Page 1589. CONNECTION TO FANUC I/O Link B–63833EN/03 9.4.3.7 DO (output signal) connection Pin number DOCOM CM68(A10),CM69(A10) Address No. Bit +24V 0V +24V Power JA58(7) Yn+5.3 CM68(A08) Relay DV Yn+5.7 DV CM68(B08) Yn+6.3 DV CM68(A09) Yn+6.7 DV CM68(B09) Yn+7.3 DV CM69(A08) Yn+7.4 DV CM69(B08) Yn+7.5 DV C
- Page 159B–63833EN/03 9. CONNECTION TO FANUC I/O Link 9.4.3.8 Manual pulse generator connection Main panel A/B/A1/B1 3 4 5 6 JA3 +5V 0V HA1 HB1 1 HA1 11 Manual pulse generator # 1 2 HB1 12 0V (M3 Screw) 3 HA2 13 3 4 5 6 4 HB2 14 0V +5V 0V HA1 HB1 5 HA3 15 Manual pulse generator # 2 6 HB3 16 0V (M3 Screw) 7 1
- Page 1609. CONNECTION TO FANUC I/O Link B–63833EN/03 9.4.3.9 When a pendant–type Main panel A/B/A1/B1 Pendant–type manual manual pulse generator pulse generator JA58 1 HA1 11 Xm+1.5 2 HB1 12 0V 3 Xm+2.2 13 Xm+1.6 Axis Multiplier Selection setting 4 Xm+2.3 14 0V 5 Xm+2.4 15 Xm+1.7 6 Xm+2.5 16 0V 7 Yn+5.3 17
- Page 161B–63833EN/03 9. CONNECTION TO FANUC I/O Link 9.4.3.10 Connector (on the cable Order specifi side) specifications Connector Maker Specification cation JD1A, JD1B, Stand wire Hirose A02B–0236–K302 JA3, JA58 press– FI30–20S (Connector) (Operators panel mount type FI–20–CV7 (Case) depth=60mm min.) JD1A,
- Page 1629. CONNECTION TO FANUC I/O Link B–63833EN/03 9.4.4 DI/DO Address 9.4.4.1 DI/DO address of Keyswitches and LED on the keyboard of Main panel Keyboard of main panel B are as follows. BIT 7 6 5 4 3 2 1 0 Key/LED Xm+4/Yn+0 B4 B3 B2 B1 A4 A3 A2 A1 Xm+5/Yn+1 D4 D3 D2 D1 D4 C3 C2 C1 Xm+6/Yn+2 A8 A7 A6 A5 E
- Page 163B–63833EN/03 9. CONNECTION TO FANUC I/O Link 9.4.4.2 Table of gray code output is as follows when the Sub panel B1 is used Override signals Rotary switch (SA1) % 0 1 2 4 6 8 10 15 20 30 40 50 60 70 80 90 95 100 105 110 120 Xm+0.0 0 1 1 0 0 1 1 0 0 1 1 0 0 1 1 0 0 1 1 0 0 Xm+0.1 0 0 1 1 1 1 0 0 0 0 1
- Page 1649. CONNECTION TO FANUC I/O Link B–63833EN/03 9.4.5 I/O address map is as follows. DI/DO Mapping DI map DO map Xm+0 Yn+0 Xm+1 General–purpose Yn+1 Xm+2 DI/DO Yn+2 Keyboard Xm+3 Yn+3 (LED) Xm+4 Yn+4 Include general– Purpose DO Xm+5 Yn+5 Xm+6 Yn+6 Xm+7 Keyboard of Yn+7 Main panel Xm+8 (Keyswitches) Xm+
- Page 165B–63833EN/03 9. CONNECTION TO FANUC I/O Link 9.4.7 Specifications 9.4.7.1 Environmental requirement Temperature At operation 0°C to 58°C Around a unit Storing or transporting –20°C to 60°C Temperature variance Max. 1.1°C/min Humidity Normally 75% or less (Relative humidity) Short time (Within one mo
- Page 1669. CONNECTION TO FANUC I/O Link B–63833EN/03 9.4.7.3 Main panel B, B1 specification Item Specification Note General–purpose DI points 32 points 24VDC type input General–purpose DO points 8 points 24VDC type output, non–insulating Keyswitches of Machine operator’s panel 55 keys Matrix DI LED Color :
- Page 167B–63833EN/03 9. CONNECTION TO FANUC I/O Link 9.4.7.6 General–purpose DI signal definition Capacity 30VDC, 16mA or more Interconnect leakage current in closed circuit 1mA or less (at 26.4V) Interconnect voltage drop in closed circuit 2V or less (including the voltage drop in the cables) Delay time Re
- Page 1689. CONNECTION TO FANUC I/O Link B–63833EN/03 9.4.8 Key Symbol Indication on Machine Operator’s Panel 9.4.8.1 Meaning of key symbols Symbol Meaning of key indication AUTO mode selection signal; Sets automatic operation mode. EDIT mode selection signal; Sets program edit opera- tion mode. MDI mode sel
- Page 169B–63833EN/03 9. CONNECTION TO FANUC I/O Link Symbol Meaning of key indication Program restart; A program may be restart at a block by specifying the sequence number of the block, after au- tomatic operation is stopped because of a broken tool or for holidays. Dryrun; Sets the axis feedrate to the jo
- Page 1709. CONNECTION TO FANUC I/O Link B–63833EN/03 9.4.8.2 Keyboard of machine operator’s panel has 55 keys. All key tops are Detachable key top detachable. MTB can customize keys and make his original key layout easily. And using transparent key top (optional), a film sheet with marking is inserted into
- Page 171B–63833EN/03 9. CONNECTION TO FANUC I/O Link 9.4.9 The keyboard of this operator’s panel is a matrix composition. When three Others or more keys are pushed, the bypass current cause unrelated key to be available. This malfunction can be prevented with ladder program. One example is shown as follows.
- Page 1729. CONNECTION TO FANUC I/O Link B–63833EN/03 (Operation of ladder program) The example of the operation of ladder program is shown about matrix DI composed of 8bits x 8commons as follows. [1] The number of datalines where the keyinput exists is examined. Logical add R1 of the data of all addresses i
- Page 173B–63833EN/03 9. CONNECTION TO FANUC I/O Link [3] When the keyinput exists in two datalines or less, it is examined whether two or more keyinput exists on the same dataline. The data of all addresses is subtracted from logical add R1 and subtraction result R2 is obtained. There are no two or more key
- Page 1749. CONNECTION TO FANUC I/O Link B–63833EN/03 9.5 CONNECTION TO THE SMALL MACHINE OPERATOR’S PANEL 9.5.1 The small machine operator’s panel is a machine operator’s panel Overview connected to the i series CNC with an I/O Link. The operator’s panel contains 30 keys, an emergency stop switch, and two o
- Page 175B–63833EN/03 9. CONNECTION TO FANUC I/O Link NOTE 1 If this operator’s panel is used together with a unit (such as an I/O module for branching) connected to an I/O Link having another MPG interface, only the MPG interface of the unit (module) nearest the CNC connected to the I/O Link will be enabled
- Page 1769. CONNECTION TO FANUC I/O Link B–63833EN/03 9.5.3.2 The emergency stop switch has contact A in two circuits and contact B Emergency stop switch in two circuits. (This signal is not sent to the CNC with a FANUC I/O Link.) The machine tool builder is required to connect the switch to other DI/DO devi
- Page 177B–63833EN/03 9. CONNECTION TO FANUC I/O Link 9.5.3.4 An example in which three manual pulse generators are connected is Manual pulse generator given below. If this operator’s panel is used together with a unit (such as an I/O module for connection) connected to an I/O Link having another connection
- Page 1789. CONNECTION TO FANUC I/O Link B–63833EN/03 Calculate the maximum allowable length of the cable for the manual pulse generator, with the method described below. Manual pulse generators are supplied with 5 VDC power. The drop in voltage due to cable resistance must not exceed 0.2V (on 0V and 5V line
- Page 179B–63833EN/03 9. CONNECTION TO FANUC I/O Link The circuit to receive the signal of the manual pulse generator is as shown in the figure below. Manual pulse generator +5V Filter 10K W R Connector – + Receiver’s C internal 0V circuit 0V Point of change of the input signal for the receiver (threshold) 3
- Page 1809. CONNECTION TO FANUC I/O Link B–63833EN/03 9.5.4 DI Signal Connection (Rotary Switch Connection) +24V Address number Pin number Bit number CM65(A04) D Rotary switch CM65(B05) A Xm+0.0 (SA1) RV Xm+0.1 CM65(A03) F RV Xm+0.2 CM65(A05) B RV Xm+0.3 CM65(B03) E RV Xm+0.4 CM65(B04) C RV Xm+0.5 CM65(B02)
- Page 181B–63833EN/03 9. CONNECTION TO FANUC I/O Link 9.5.5 I/O Address 9.5.5.1 The I/O address correspondence between the key switches on the machine Keyboard of the operator’s panel and LEDs are as follows. operator’s panel BIT 5 4 3 2 1 0 Key/LED Xm+4/Yn+0 A6 A5 A4 A3 A2 A1 Xm+5/Yn+1 B6/ B5/ B4/ B3 B2 B1
- Page 1829. CONNECTION TO FANUC I/O Link B–63833EN/03 9.5.5.2 Gray codes are output according to the table below. Override signals Rotary switch (SA1) % 0 1 2 4 6 8 10 15 20 30 40 50 60 70 80 90 95 100 105 110 120 Xm+0.0 0 1 1 0 0 1 1 0 0 1 1 0 0 1 1 0 0 1 1 0 0 Xm+0.1 0 0 1 1 1 1 0 0 0 0 1 1 1 1 0 0 0 0 1 1
- Page 183B–63833EN/03 9. CONNECTION TO FANUC I/O Link 9.5.6 The I/O address maps for the main panel are as follows. I/O Address Allocation Map of the DI space Map for the DO space Xm+0 General–purpose DI Yn+0 Xm+1 (Rotary switch) Yn+1 Operator’s panel Xm+2 Yn+2 Keyboard Reserved (LED) Xm+3 Yn+3 Xm+4 Yn+4 Xm+
- Page 1849. CONNECTION TO FANUC I/O Link B–63833EN/03 9.5.7.1 Outline drawing and panel–cut drawing of the small machine operator’s panel Umit: mm Weight : 1.5kg Panel–cut drawing 170
- Page 185B–63833EN/03 9. CONNECTION TO FANUC I/O Link 9.5.7.2 Layout of the key sheet (1) M series 171
- Page 1869. CONNECTION TO FANUC I/O Link B–63833EN/03 (2) T series 172
- Page 187B–63833EN/03 9. CONNECTION TO FANUC I/O Link 9.5.8 Connector Layout of the Small Machine Operator’s Panel 4–f4 Unit: mm
Fuse (1A) Terminal for grounding (M3 screw) 173 - Page 1889. CONNECTION TO FANUC I/O Link B–63833EN/03 9.5.9 Specifications 9.5.9.1 Environmental requirement Temperature At operation 0°C to 55°C Around a unit Storing or transporting –20°C to 60°C Temperature variance Max. 1.1°C/min Humidity Normally 75% or less (Relative humidity) Short time (Within one mo
- Page 189B–63833EN/03 9. CONNECTION TO FANUC I/O Link 9.5.9.4 Power supply specification Item Capacity Remarks 24VDC "10% (from Power connector 0.4A Including all DI consumption CPD1, including momentary values) Momentary values and ripples are also included in "10%. 9.5.10 Key Symbol Indication on Machine O
- Page 1909. CONNECTION TO FANUC I/O Link B–63833EN/03 Symbol English Meaning of key indication Block skip: Pressing this button during auto- BLOCK matic operation causes the block under execu- SKIP tion to stop, skipping to the end of block (;). Program stop (output only); Turns on the PRG LED on the button
- Page 191B–63833EN/03 9. CONNECTION TO FANUC I/O Link 9.5.10.2 If a customer wishes to partially modify the standard key sheet, he or she Customization of the key can customize the key sheet. sheet D The machine tool builder prints out the desired key indication on a sticker prepared by the machine tool buil
- Page 1929. CONNECTION TO FANUC I/O Link B–63833EN/03 9.5.12 Consumables Maintenance Parts Name Ordering specification Remarks Fuse (Operator’s panel I/O printed A60L–0001–0290#LM10 Rated: 1A circuit board) Items to be repaired Name Ordering specification Remarks Operator’s panel I/O printed circuit A20B–200
- Page 193B–63833EN/03 9. CONNECTION TO FANUC I/O Link 9.6 CONNECTION OF CONNECTOR PANEL I/O MODULE 9.6.1 Configuration Flat cable for module connection Direction to be used when the Direction to be used when modules are the modules are connected directly to the connection mounted using printed circuit board
- Page 1949. CONNECTION TO FANUC I/O Link B–63833EN/03 9.6.2 Connection Diagram CNC I/O UNIT I/O Link JD1B JD1A (JD44A) JD1B JD1A CA52 CB150 Basic module MPG +24 V power supply MPG JA3 DI/DO module MPG Connector panel CA53 CB150 Machine side DI/DO CA52 Expansion module (with MPG (Note)) 2A output CA53 module
- Page 195B–63833EN/03 9. CONNECTION TO FANUC I/O Link NOTE 1 Ensure that the expansion module with the MPG interface is located nearest to the basic module, as shown in the figure. The MPG can be connected to the connector panel I/O module only when the i series CNC is used. 2 The connection diagram above sh
- Page 1969. CONNECTION TO FANUC I/O Link B–63833EN/03 Installation conditions Ambient temperature Operation: 0°C to 55°C for the unit Storage and transportation: –20°C to 60°C Temperature change 1.1°C/minute maximum Humidity Normal condition: 75% (relative humidity) Short term (within one month): 95% (relati
- Page 197B–63833EN/03 9. CONNECTION TO FANUC I/O Link 9.6.4 This section describes the DI/DO connector pin allocation of the basic DI/DO Connector Pin module and expansion modules A and B. Assignment CB150 (HONDA MR–50RMA) 33 DOCOM 01 DOCOM 50 male pins with fittings for 34 Yn+0.0 02 Yn+1.0 fixing the connec
- Page 1989. CONNECTION TO FANUC I/O Link B–63833EN/03 9.6.5 This section describes the DI (input signal) connections of the basic DI (Input Signal) module and expansion modules A and B. Connection d A maximum of 96 points are provided (24 points per module; 1 basic module + 3 expansion modules). Pin number A
- Page 199B–63833EN/03 9. CONNECTION TO FANUC I/O Link Pin number Address number CB150(18) +24V Bit number CB150(50) Xm+2.0 CB150(10) RV +24V 0V +24 V stabilized Xm+2.1 CB150(11) power supply RV Xm+2.2 CB150(12) RV Xm+2.3 CB150(13) RV Xm+2.4 CB150(14) RV Xm+2.5 CB150(15) RV Xm+2.6 CB150(16) RV Xm+2.7 CB150(17
- Page 2009. CONNECTION TO FANUC I/O Link B–63833EN/03 9.6.6 This section describes the DO (output signal) connections of the basic DO (Output Signal) module and expansion modules A and B. Connection d A maximum of 64 points are provided (16 points per module; 1 basic module + 3 expansion modules). Pin number
- Page 201B–63833EN/03 9. CONNECTION TO FANUC I/O Link 9.6.7 This section describes the specifications of the DI/DO signals used with DI/DO Signal the basic module and expansion modules A and B. Specifications DI (input signal specifications) Number of points 24 points (per module) Contact rating 30 VDC, 16 m
- Page 2029. CONNECTION TO FANUC I/O Link B–63833EN/03 NOTE When DO is on in the sequence, the ON/OFF state of DOCOM is directly reflected in the DO state as indicated above by the dashed box. The +24 V signal to be supplied to the I/O module must not be turned off during operation. Otherwise, a CNC communica
- Page 203B–63833EN/03 9. CONNECTION TO FANUC I/O Link 9.6.8 This section describes the 2A output connector pin allocation of 2A Output Connector expansion module C. Pin Allocation CB154 (HONDA MR–50RMA) 33 DOCOMA 01 DOCOMA 50 pins, male, 34 Yn+0.0 02 Yn+1.0 with a metal fitting for securing 19 GNDA the conne
- Page 2049. CONNECTION TO FANUC I/O Link B–63833EN/03 9.6.9 This section describes the 2A output connector connections of expansion 2A DO (Output Signal) module C. Connection V+ 0V Address number Bit number 24VDC DV Solenoid, etc. 0V 190
- Page 205B–63833EN/03 9. CONNECTION TO FANUC I/O Link 9.6.10 This section describes the specifications of the 2A output DO signals used 2A Output DO Signal with expansion module C. Specifications DO (output signal specifications) Number of points 32 points (per module) Maximum load current 2 A or less per po
- Page 2069. CONNECTION TO FANUC I/O Link B–63833EN/03 9.6.11 This section describes the analog input connector pin allocation of Analog Input expansion module D. Connector Pin CB157 (HONDA MR–50RMA) Allocation 33 INM3 01 INM1 50 pins, male, 34 COM3 02 COM1 with a metal fitting for securing 19 FGND the connec
- Page 207B–63833EN/03 9. CONNECTION TO FANUC I/O Link 9.6.12 This section provides a diagram of the analog input connector Analog Input Signal connections of expansion module D. Connections Analog input module Pin number Not connected For voltage input Voltage source 0V (Common to all channels) Analog input
- Page 2089. CONNECTION TO FANUC I/O Link B–63833EN/03 NOTE 1 In the diagram above, n represents each channel (n = 1, 2, 3, 4). 2 Current input or voltage input can be selected on a channel–by–channel basis. For current input, connect JMPn to INPn. 3 For the connection, use a shielded twisted pair. 4 In the d
- Page 209B–63833EN/03 9. CONNECTION TO FANUC I/O Link 9.6.13 This section describes the specifications of the analog input signals used Analog Input Signal with expansion module D. Specifications Item Specifications Remarks Number of input Four channels channels (Note) Analog input DC –10 to +10 V Voltage in
- Page 2109. CONNECTION TO FANUC I/O Link B–63833EN/03 9.6.14 (Digital output) Analog Input This digital input module has four input channels. The digital output Specifications section consists of a group of 12 bits within the three–byte occupied input points. The output format is indicated below. Address in
- Page 211B–63833EN/03 9. CONNECTION TO FANUC I/O Link Address in the module 7 6 5 4 3 2 1 0 Xm+3 (odd–numbered address) Undefined Xm+4 (even–numbered address) D07 D06 D05 D04 D03 D02 D01 D00 Xm+5 (odd–numbered address) 0 0 CHB CHA D11 D10 D09 D08 D When the analog input module is allocated in the space for e
- Page 2129. CONNECTION TO FANUC I/O Link B–63833EN/03 9.6.15 An example in which three manual pulse generators are connected to Manual Pulse expansion module A is shown below. The manual pulse generator can be connected only for the i series CNC. Generator Connection Expansion module Manual pulse generators
- Page 213B–63833EN/03 9. CONNECTION TO FANUC I/O Link (These cables do not include the wire shown in the above figure.) NOTE The number of connectable manual pulse generators depends on the type and option configuration. 9.6.16 Like a pulse coder, the manual pulse generator operates on 5 VDC. The Cable Lengt
- Page 2149. CONNECTION TO FANUC I/O Link B–63833EN/03 9.6.17 Modules can be connected in the same way, regardless of whether you are Connection of Basic connecting the basic module to an expansion module or connecting two expansion modules. Connect the modules by using 34–pin flat cable and Expansion connect
- Page 215B–63833EN/03 9. CONNECTION TO FANUC I/O Link 9.6.18 When connecting a connector panel printed circuit board directly Module Installation (external module view and mounting diagram) Dimensions of connector panel printed circuit board ±0.2 Board thickness 1.6 mm Square hole No. 1 pin Square hole I/O L
- Page 2169. CONNECTION TO FANUC I/O Link B–63833EN/03 When connecting a connector panel printed circuit board directly (mounting and dismounting a module) Hook Stopper Connector panel printed circuit board Mounting the module 1. Insert the hook of the module into the square hole located at the upper part of
- Page 217B–63833EN/03 9. CONNECTION TO FANUC I/O Link When mounting a DIN rail (external module view and mounting diagram) Mount the DIN rail here. MPG interface I/O Link interface (for expansion module) Note I/O interface NOTE Recommended connector: A02B–0098–K891 (including the following connector and case
- Page 2189. CONNECTION TO FANUC I/O Link B–63833EN/03 When mounting a DIN rail (mounting and dismounting a module) Hook DIN rail Stopper Slotted screwdriver Mounting the module 1. Hook the module at the upper end of the DIN rail. 2. Push the stopper into the slit located at the lower end of the rail until it
- Page 219B–63833EN/03 9. CONNECTION TO FANUC I/O Link When mounting a module using screws (external module view and mounting diagram) Note Screw holes I/O interface I/O Link interface MPG interface (for expansion module) JD1A JD1B NOTE Recommended connector: A02B–0098–K891 (including the following connector
- Page 2209. CONNECTION TO FANUC I/O Link B–63833EN/03 9.6.19 Other Notes DO signal reaction to a If a system alarm occurs in a CNC using the connector panel I/O module, system alarm or if I/O Link communication between the CNC and connector panel I/O module fails, all the DO signals of the I/O module are tur
- Page 221B–63833EN/03 9. CONNECTION TO FANUC I/O Link Fixed addresses directly supervised by the CNC (for FS21i/210i) 7 6 5 4 3 2 1 0 X0004 SKIP ESKIP –MIT2 +MIT2 –MIT1 +MIT1 ZAE XAE SKIP6 SKIP5 SKIP4 SKIP3 SKIP2 SKIP8 SKIP7 SKIP ESKIP SKIP5 SKIP4 SKIP3 ZAE YAE XAE SKIP6 SKIP2 SKIP8 SKIP7 X0005 X0006 X0007 X
- Page 2229. CONNECTION TO FANUC I/O Link B–63833EN/03 DO (output signal) alarm The DO driver of the Basic and Expansion module A/B is capable of detection detecting an overcurrent and measuring its own temperature. If an accident, such as the connecting of the cable to ground, causes an abnormal increase in
- Page 223B–63833EN/03 9. CONNECTION TO FANUC I/O Link 9.6.20 By changing the setting (rotary switch) for the expansion modules, Distribution I/O Setting connections can be made by omitting some expansion modules as shown below. Expansion module 1 Expansion module 2 Expansion module 3 Expansion module 1 Expan
- Page 2249. CONNECTION TO FANUC I/O Link B–63833EN/03 The function of the rotary switch is as follows: Setting Actual Meaning of setting position indication 0 0 This is the standard setting. The rotary switch is factory–set to this position. This setting is used when no expansion module is omitted. 1 – Set t
- Page 225B–63833EN/03 9. CONNECTION TO FANUC I/O Link Examples of setting (When expansion module 1 is omitted) On expansion module 2, set the rotary Expansion module 1 Expansion module 2 Expansion module 3 switch to setting position 1. On expan- sion module 3, keep the rotary switch Basic module set to setti
- Page 2269. CONNECTION TO FANUC I/O Link B–63833EN/03 9.7 CONNECTION OF OPERATOR’S PANEL I/O MODULE (FOR MATRIX INPUT) 9.7.1 Overall Connection Diagram CNC I/O UNIT I/O Link JD1B JD1A (JD44A) JD1B JD1A CE53 MPG JA3 Machine operator’s panel MPG MPG CE54 +24 V power supply CPD1(IN) +24 V power supply CPD1(OUT)
- Page 227B–63833EN/03 9. CONNECTION TO FANUC I/O Link Connectors that cannot be used on the cable side Specification Manufacturer Connector FI–20–CV7 Hirose Electric Co., Ltd. Connector case and connector FI30–20S–CV7 Hirose Electric Co., Ltd. 9.7.2 Provide the CPD1 (IN) connector, shown below, with the powe
- Page 2289. CONNECTION TO FANUC I/O Link B–63833EN/03 9.7.3 DI/DO Connector Pin CE53 CE54 Arrangement A B A B 01 0V 0V 01 0V 0V 02 N.C. +24V 02 COM1 +24V 03 Xm+0.0 Xm+0.1 03 Xm+1.0 Xm+1.1 04 Xm+0.2 Xm+0.3 04 Xm+1.2 Xm+1.3 05 Xm+0.4 Xm+0.5 05 Xm+1.4 Xm+1.5 06 Xm+0.6 Xm+0.7 06 Xm+1.6 Xm+1.7 07 Yn+0.0 Yn+0.1 07
- Page 229B–63833EN/03 9. CONNECTION TO FANUC I/O Link 9.7.4 DI (General–purpose Input Signal) Pin number Connection Address number CE53(B02) +24V Bit number CE54(B02) Xm+0.0 CE53(A03) RV Xm+0.1 CE53(B03) RV Xm+0.2 CE53(A04) RV Xm+0.3 CE53(B04) RV Xm+0.4 CE53(A05) RV Xm+0.5 CE53(B05) RV Xm+0.6 CE53(A06) RV Xm
- Page 2309. CONNECTION TO FANUC I/O Link B–63833EN/03 NOTE 1 Xm+1.0 through Xm+1.7 are DI pins for which a common voltage can be selected. That is, by connecting the COM1 CE54(A02) pin to the +24 V power supply, a DI signal can be input with its logical state reversed. If, however, a cable is connected to gr
- Page 231B–63833EN/03 9. CONNECTION TO FANUC I/O Link 9.7.5 d A maximum of 56 points are provided. DI (Matrix Input Signal) Connection *KCM1 CE53(A23) Xn+4.0 Xn+4.1 Xn+4.2 Xn+4.3 Xn+4.4 Xn+4.5 Xn+4.6 Xn+4.7 CE53(B23) Xn+5.0 Xn+5.1 Xn+5.2 Xn+5.3 Xn+5.4 Xn+5.5 Xn+5.6 Xn+5.7 *KCM2 CE53(A24) Xn+6.0 Xn+6.1 Xn+6.2
- Page 2329. CONNECTION TO FANUC I/O Link B–63833EN/03 9.7.6 d A maximum of 56 points are provided. DO (Output Signal) Connection Pin number CE53(A25,B25) DOCOM CE54(A25,B24,B25) Address number Bit number +24V 0V +24 V stabilized power supply Yn+0.0 CE53(A07) Relay DV Yn+0.1 CE53(B07) DV Yn+0.2 CE53(A08) DV Y
- Page 233B–63833EN/03 9. CONNECTION TO FANUC I/O Link Pin number CE53(A25,B25) DOCOM CE54(A25,B24,B25) Address number Bit number +24V 0V +24 V stabilized power supply Yn+2.0 CE53(A15) Relay DV Yn+2.1 CE53(B15) DV Yn+2.2 CE53(A16) DV Yn+2.3 CE53(B16) DV Yn+2.4 CE53(A17) DV Yn+2.5 CE53(B17) DV Yn+2.6 CE53(A18)
- Page 2349. CONNECTION TO FANUC I/O Link B–63833EN/03 Pin number CE53(A25,B25) DOCOM CE54(A25,B24,B25) Address number Bit number +24V 0V +24 V stabilized power supply Yn+4.0 CE54(A11) Relay DV Yn+4.1 CE54(B11) DV Yn+4.2 CE54(A12) DV Yn+4.3 CE54(B12) DV Yn+4.4 CE54(A13) DV Yn+4.5 CE54(B13) DV Yn+4.6 CE54(A14)
- Page 235B–63833EN/03 9. CONNECTION TO FANUC I/O Link Pin number CE53(A25,B25) DOCOM CE54(A25,B24,B25) Address number Bit number +24V 0V +24 V stabilized power supply Yn+6.0 CE54(A19) Relay DV Yn+6.1 CE54(B19) DV Yn+6.2 CE54(A20) DV Yn+6.3 CE54(B20) DV Yn+6.4 CE54(A21) DV Yn+6.5 CE54(B21) DV Yn+6.6 CE54(A22)
- Page 2369. CONNECTION TO FANUC I/O Link B–63833EN/03 9.7.8 External View 5-φ3.2 65 95 95 24 V power supply connection Manual pulse I/O Link signal connection generator connection Machine operator’s panel DI/DO interface Note) Lead wires and other components are mounted on the rear Note face of the printed c
- Page 237B–63833EN/03 9. CONNECTION TO FANUC I/O Link 9.7.9 Installation specifications Specifications Ambient temperature During operation 0°C to 58°C During storage and transportation –20°C to 60°C Temperature change Max. 1.1°C/min. Relative humidity Normal : 75% or less Short term (1 month or less) : 95%
- Page 2389. CONNECTION TO FANUC I/O Link B–63833EN/03 Power supply rating Module Supply voltage Current rating Remarks Operator’s panel 24 VDC "10% supplied 0.35A The total power I/O module from the power supply consumption of connector CPD1. The DI points is allowance of "10% included. should include (This
- Page 239B–63833EN/03 9. CONNECTION TO FANUC I/O Link DO (output signal) specifications Maximum load current in ON state 200 mA or less (including momentary current) Saturation voltage in ON state Max. 1 V (when load current is 200 mA) Withstand voltage 24 V +20% or less (including momentary values) Leakage
- Page 2409. CONNECTION TO FANUC I/O Link B–63833EN/03 9.7.10 Other Notes DO signal reaction to a If a system alarm occurs in the CNC using the operator’s panel I/O system alarm module, or if I/O Link communication between the CNC and operator’s panel I/O module fails, all the DO signals of the I/O module are
- Page 241B–63833EN/03 9. CONNECTION TO FANUC I/O Link Fixed addresses directly supervised by the CNC (for FS21i/210i) 7 6 5 4 3 2 1 0 SKIP ESKIP –MIT2 +MIT2 –MIT1 +MIT1 ZAE XAE X0004 SKIP6 SKIP5 SKIP4 SKIP3 SKIP2 SKIP8 SKIP7 SKIP ESKIP SKIP5 SKIP4 SKIP3 ZAE YAE XAE SKIP6 SKIP2 SKIP8 SKIP7 X0005 X0006 X0007 X
- Page 2429. CONNECTION TO FANUC I/O Link B–63833EN/03 NOTE When the DO signal is in the ON state in the sequence, the ON or OFF state of the DOCOM pin determines the state of the signal, as indicated by the dotted lines in the above figure. Do not turn off the +24 V supply, provided by the CPD1 to the I/O mo
- Page 243B–63833EN/03 9. CONNECTION TO FANUC I/O Link DO (output signal) alarm The DO driver of the I/O module is capable of detecting an overcurrent detection and measuring its own temperature. If an accident, such as connecting the cable to ground, causes an abnormal increase in the load current or in the
- Page 2449. CONNECTION TO FANUC I/O Link B–63833EN/03 9.8 The difference between the operator’s panel I/O module and the power magnetics cabinet I/O module lies in whether an interface to a manual CONNECTION OF pulse generator is provided. The power magnetics cabinet does not OPERATOR’S PANEL provide an inte
- Page 245B–63833EN/03 9. CONNECTION TO FANUC I/O Link NOTE The MPG can be connected to this operator’s panel I/O module only when the i series CNC is used. When the operator’s panel I/O module is used together with a unit (connector panel I/O module) connected to the I/O Link supporting another MPG interface
- Page 2469. CONNECTION TO FANUC I/O Link B–63833EN/03 9.8.2 Provide the CPD1 (IN) connector, shown below, with the power Power Connection necessary for the printed circuit board operation and that for DI operation. To facilitate power division, the power is output to CPD1 (OUT) exactly as it is input from CP
- Page 247B–63833EN/03 9. CONNECTION TO FANUC I/O Link 9.8.3 DI/DO Connector Pin CE56 CE57 Arrangement A B A B 01 0V +24V 01 0V +24V 02 Xm+0.0 Xm+0.1 02 Xm+3.0 Xm+3.1 03 Xm+0.2 Xm+0.3 03 Xm+3.2 Xm+3.3 04 Xm+0.4 Xm+0.5 04 Xm+3.4 Xm+3.5 05 Xm+0.6 Xm+0.7 05 Xm+3.6 Xm+3.7 06 Xm+1.0 Xm+1.1 06 Xm+4.0 Xm+4.1 07 Xm+1
- Page 2489. CONNECTION TO FANUC I/O Link B–63833EN/03 9.8.4 DI (General–purpose Input Signal) Connection Pin number Address number CE56(B01) Bit number +24V CE57(B01) Xm+0.0 CE56(A02) RV Xm+0.1 CE56(B02) RV Xm+0.2 CE56(A03) RV Xm+0.3 CE56(B03) RV Xm+0.4 CE56(A04) RV Xm+0.5 CE56(B04) RV Xm+0.6 CE56(A05) RV Xm
- Page 249B–63833EN/03 9. CONNECTION TO FANUC I/O Link Pin number Address number CE56(B01) Bit number +24V CE57(B01) Xm+2.0 CE56(A10) RV Xm+2.1 CE56(B10) RV Xm+2.2 CE56(A11) RV Xm+2.3 CE56(B11) RV Xm+2.4 CE56(A12) RV Xm+2.5 CE56(B12) RV Xm+2.6 CE56(A13) RV Xm+2.7 CE56(B13) RV 0V Xm+3.0 CE57(A02) RV Xm+3.1 CE5
- Page 2509. CONNECTION TO FANUC I/O Link B–63833EN/03 Pin number Address number CE56(B01) Bit number +24V CE57(B01) Xm+4.0 CE57(A06) RV Xm+4.1 CE57(B06) RV Xm+4.2 CE57(A07) RV Xm+4.3 CE57(B07) RV Xm+4.4 CE57(A08) RV Xm+4.5 CE57(B08) RV Xm+4.6 CE57(A09) RV Xm+4.7 CE57(B09) RV 0V Xm+5.0 CE57(A10) RV Xm+5.1 CE5
- Page 251B–63833EN/03 9. CONNECTION TO FANUC I/O Link NOTE 1 Xm+0.0 through Xm+0.7 and Xm+5.0 through Xm+5.7 are DI pins for which a common voltage can be selected. That is, by connecting the DICOM0 CE56(A14) or DICOM5 CE57(B14) pin to the +24 V power supply, a DI signal can be input with its logical state r
- Page 2529. CONNECTION TO FANUC I/O Link B–63833EN/03 9.8.5 DO (Output Signal) Connection Pin number CE56(A24,B24,A25,B25) DOCOM CE57(A24,B24,A25,B25) Address number Bit number +24V 0V +24 V stabilized power supply Yn+0.0 CE56(A16) Relay DV Yn+0.1 CE56(B16) DV Yn+0.2 CE56(A17) DV Yn+0.3 CE56(B17) DV Yn+0.4 C
- Page 253B–63833EN/03 9. CONNECTION TO FANUC I/O Link Pin number CE56(A24,B24,A25,B25) DOCOM CE57(A24,B24,A25,B25) Address number Bit number +24V 0V +24 V stabilized power supply Yn+2.0 CE57(A16) Relay DV Yn+2.1 CE57(B16) DV Yn+2.2 CE57(A17) DV Yn+2.3 CE57(B17) DV Yn+2.4 CE57(A18) DV Yn+2.5 CE57(B18) DV Yn+2
- Page 2549. CONNECTION TO FANUC I/O Link B–63833EN/03 9.8.6 For details of the connection of the manual pulse generator, see Section Manual Pulse 9.6.15. Generator Connection 9.8.7 External View 5-φ3.2 65 95 95 24 V power supply connection Manual pulse I/O Link signal connection generator connection Machine
- Page 255B–63833EN/03 9. CONNECTION TO FANUC I/O Link 9.8.8 Installation specifications Specifications Ambient temperature During operation 0° to 58°C During storage and transportation –20°C to 60°C Temperature change Max. 1.1°C/min. Relative humidity Normal: 75% or less Short term (1 month or less): 95% or
- Page 2569. CONNECTION TO FANUC I/O Link B–63833EN/03 Power supply rating Power supply Module Supply voltage Remarks rating Operator’s 24 VDC ±10% is 0.3 A+7.3 mA×DI DI = number of DI panel I/O supplied from points in the ON module and power supply state power connector CPD1. magnetics The tolerance of cabin
- Page 257B–63833EN/03 9. CONNECTION TO FANUC I/O Link 9.8.9 Other Notes DO signal reaction to a If a system alarm occurs in a CNC using this 48/32–point I/O module, or system alarm if I/O Link communication between the CNC and operator’s panel I/O module fails, all the DO signals of the I/O module are turned
- Page 2589. CONNECTION TO FANUC I/O Link B–63833EN/03 Fixed addresses directly supervised by the CNC (for FS21i/210i) 7 6 5 4 3 2 1 0 SKIP ESKIP –MIT2 +MIT2 –MIT1 +MIT1 ZAE XAE X0004 SKIP6 SKIP5 SKIP4 SKIP3 SKIP2 SKIP8 SKIP7 SKIP ESKIP SKIP5 SKIP4 SKIP3 ZAE YAE XAE SKIP6 SKIP2 SKIP8 SKIP7 X0005 X0006 X0007 X
- Page 259B–63833EN/03 9. CONNECTION TO FANUC I/O Link NOTE When the DO signal is in the ON state in the sequence, the ON or OFF state of the DOCOM pin determines the state of the signal, as shown within dotted lines in the above figure. Do not turn off the +24 V supply provided by the CPD1 to the I/O module
- Page 2609. CONNECTION TO FANUC I/O Link B–63833EN/03 DO (output signal) alarm The DO driver of the I/O module is capable of detecting an overcurrent detection and measuring its own temperature. If an accident, such as the connecting of the cable to ground, causes an abnormal increase in the load current or
- Page 261B–63833EN/03 9. CONNECTION TO FANUC I/O Link 9.9 The operator’s panel connection unit (A16B–2202–0730, 0731), which connects to the control unit via the FANUC I/O Link, acts as an interface CONNECTION OF with the machine operator’s panel. SOURCE OUTPUT Connectors CM51, CM52, CMB3, and CMB4, used to
- Page 2629. CONNECTION TO FANUC I/O Link B–63833EN/03 9.9.1 Most input signals for the source output type connection unit support a Input Signal sink type non–isolated interface. For some input signals, however, either sink or source type can be selected. (European safety standards demand Specifications for
- Page 263B–63833EN/03 9. CONNECTION TO FANUC I/O Link DC input signal OFF (High) (Signal) (Signal) ON (Low) Logical 0 (18 V or higher) Logical 1 (6V or lower) Chattering of 5 ms or less is ig- nored. Receiver output signal 5 to 22ms 5 to 22ms Fig. 9.9.1 (b) Signal width and delay of input signal In the above
- Page 2649. CONNECTION TO FANUC I/O Link B–63833EN/03 CAUTION A power supply which satisfies the above specifications shall be connected to the DOCOM and 0V power supply terminals for the output signals. The maximum current that can be carried by the DOCOM pin is 2.0 A. The total load current must not exceed
- Page 265B–63833EN/03 9. CONNECTION TO FANUC I/O Link NOTE The above red LED and alarm transfer to the CNC are supported by PCBs of version 03B and later. If the output of a signal cannot be turned on even though the CNC diagnostic indicates that the signal is on, that signal or another signal being handled
- Page 2669. CONNECTION TO FANUC I/O Link B–63833EN/03 Notes on output signals CAUTION Observe the following precautions when connecting output signals: Output pins shall not be connected in parallel, as shown below. DOCOM +24V 0V Relay DV DV 0V CAUTION When using a dimming resistor, connect a diode to preven
- Page 267B–63833EN/03 9. CONNECTION TO FANUC I/O Link 9.9.3 Connector Pin Layout for Source Output Type Connection Unit CM51 CM52 1 DI00 33 DICMN1 1 DI60 33 0V 2 DI03 34 DI02 2 DI63 34 DI62 19 DI01 19 DI61 3 DI06 35 DI05 3 DI66 35 DI65 20 DI04 20 DI64 4 DI11 36 DI10 4 DI71 36 DI70 21 DI07 21 DI67 5 DI14 37 D
- Page 2689. CONNECTION TO FANUC I/O Link B–63833EN/03 NOTE When the operator’s panel connection unit having 64 DIs and 32 DOs is selected, connector CMB4 is not mounted on the PCB. DICMN1, DICMN2: Pins used to switch the DI common. Usually, jumper these pins with 0V. (input) +24V: +24 VDC output pin. This pi
- Page 269B–63833EN/03 9. CONNECTION TO FANUC I/O Link [DO address] 7 6 5 4 3 2 1 0 Yq DO07 DO06 DO05 DO04 DO03 DO02 DO01 DO00 DO: DO: Y q+1 DO17 DO16 DO15 DO14 DO13 DO12 DO11 DO10 64 32 points points Y q+2 DO27 DO26 DO25 DO24 DO23 DO22 DO21 DO20 Y q+3 DO37 DO36 DO35 DO34 DO33 DO32 DO31 DO30 Y q+4 DO47 DO46 D
- Page 2709. CONNECTION TO FANUC I/O Link B–63833EN/03 9.9.4 Dimensions of Source Output Type Connection Unit 4–f5mm CP1 15 mm 336mm 50mm 10 mm CP1 JD1B 12 12 43 1 2 3 JD1A CP61 35 154 mm 120 mm 155 17.78 mm CMB4 MR20RM CMB3 CM52 CM51 11.72 MR50RM MR50RM MR50RM mm 20 50 50 50 Approx. 31.05mm 46.99mm 88.9mm 88
- Page 271B–63833EN/03 9. CONNECTION TO FANUC I/O Link 9.10 CONNECTING THE FANUC SERVO UNIT β SERIES WITH I/O Link 9.10.1 The FANUC servo unit β series with I/O Link (called the β amplifier with Overview I/O Link) is a power motion control servo unit that can be easily connected to a CNC control unit via the
- Page 2729. CONNECTION TO FANUC I/O Link B–63833EN/03 9.10.2 The β amplifier with I/O Link is connected to the Series 0i using the usual Connection FANUC I/O Link connection. Control unit FANUC SERVO UNIT β series with I/O Link JD1B I/O JD1A LINK I/O IOLINK LINK I/O Link cable JD1A I/O Link cable JD1B I/O LI
- Page 273B–63833EN/03 9. CONNECTION TO FANUC I/O Link 9.10.3 The maximum number of β amplifiers with I/O Link that can be Maximum Number of connected to a control unit depends on the maximum number of FANUC I/O Link points provided by that control unit, as well as their assignments. Units that can be For the
- Page 27410. EMERGENCY STOP SIGNAL B–63833EN/03 10 EMERGENCY STOP SIGNAL Using the emergency stop signal effectively enables the design of safe WARNING machine tools. See ”Cautions for configuring emergency stop circuit in compliance with safety standards.” The emergency stop signal is provided to bring a ma
- Page 275B–63833EN/03 10. EMERGENCY STOP SIGNAL Stroke end limit switch Emergency stop button +X –X +Y –Y +Z –Z +4 –4 Relay power Release switch Spark killer SK EMG Relay CNC control unit emg1 +24 *ESP αi series servo amplifier SVM (PSM) SPM emg2 +24 *ESP MCCOFF3 MCCOFF4 External power source L1 L2 L3 Spark
- Page 27610. EMERGENCY STOP SIGNAL B–63833EN/03 Cautions for config- To configure an emergency stop circuit in compliance with JIS safety standards(*), observe the following cautions. Compliance with these JIS uring an emergency safety standards is a prerequisite for complying with the EC Machine stop circui
- Page 277B–63833EN/03 11. HIGH–SPEED SERIAL BUS (HSSB) 11 HIGH–SPEED SERIAL BUS (HSSB) 263
- Page 27811. HIGH–SPEED SERIAL BUS (HSSB) B–63833EN/03 11.1 The high–speed serial bus (HSSB) enables the high–speed transfer of large amounts of data between a commercially available IBM PC or OVERVIEW compatible personal computer and a CNC, by connecting them via a high–speed optical fiber. On the CNC, the
- Page 279B–63833EN/03 11. HIGH–SPEED SERIAL BUS (HSSB) 11.2 The use of the HSSB requires an IBM PC/AT compatible computer or FANUC intelligent terminal. The machine tool builder or end user is CAUTIONS required to procure and maintain the personal computer. To enable the use of the HSSB, Windows 95/Windows N
- Page 28011. HIGH–SPEED SERIAL BUS (HSSB) B–63833EN/03 11.3 CONNECTION DIAGRAM Series 0i control unit PC/AT compatible personal computer COP7 Personal computer interface card High–speed serial bus Insert the HSSB board into the mini slot. Order specification for each board Order specification PCB drawing No.
- Page 281B–63833EN/03 11. HIGH–SPEED SERIAL BUS (HSSB) 11.4 PERSONAL COMPUTER CAUTION SPECIFICATION 1 FANUC requires the customer to buy and maintain the personal computer itself. 2 FANUC is not responsible for the proper working about the personal computer itself and any troubles caused by using the persona
- Page 28211. HIGH–SPEED SERIAL BUS (HSSB) B–63833EN/03 11.5 (1) Personal computer interface boards INSTALLATION The same environmental conditions as those for the installation of the personal computer must be satisfied. ENVIRONMENT (2) CNC interface board The same environmental conditions as those for the in
- Page 283B–63833EN/03 11. HIGH–SPEED SERIAL BUS (HSSB) 11.7 PROCEDURE FOR WARNING INSTALLING Before starting to mount or remove a personal computer PERSONAL interface board, switch off the personal computer and its COMPUTER peripheral devices, and disconnect their power supply INTERFACE BOARDS cables. Otherw
- Page 28411. HIGH–SPEED SERIAL BUS (HSSB) B–63833EN/03 Setting the rotary switch Using the rotary switch on the interface board in the personal computer, on the interface board in set the base address of the I/O space for use by this HSSB board. the personal computer 1. Setting of I/O Base Address in Case of
- Page 285B–63833EN/03 11. HIGH–SPEED SERIAL BUS (HSSB) D In case of PCI type In case that two or more same PCI type boards are mounted to PCI slots, some devices of same boards are registered to Device Manager as “HSSB Type 2 PCI 1(2) channel” in item of “FANUC Open CNC”. The upper device registered to Devic
- Page 28611. HIGH–SPEED SERIAL BUS (HSSB) B–63833EN/03 D In case of PCI type Select “Use PCI” at I/O port address. Then input CNC type and its name connected to the channel. The node which is selected as “Use PCI” is allotted in order to PCI type board which inserted in lower PCI slot number, as follows. 2nd
- Page 287B–63833EN/03 11. HIGH–SPEED SERIAL BUS (HSSB) 11.8 RECOMMENDED CABLES Personal computer CNC interface card interface card Optical fiber cable COP7 COP7 (COP7A, COP7B) Usable Optical Fiber Cable (The FSSB optical fiber cable to be used outside of the cabinet.) A66L–6001–0026#L1R003 : Cable Length = 1
- Page 28812. FANUC DNC2 INTERFACE B–63833EN/03 12 FANUC DNC2 INTERFACE 274
- Page 289B–63833EN/03 12. FANUC DNC2 INTERFACE 12.1 FANUC DNC2 is a communication protocol that provides an RS–232–C interface between the CNC and a personal computer (PC). This interface GENERAL enables the CNC and PC to exchange data with each other. The hardware used to connect the CNC and PC is the same
- Page 29012. FANUC DNC2 INTERFACE B–63833EN/03 12.2 DNC2 INTERFACE CNC OPTION board Host computer (Example) (RS–232–C) JD28A (PCR–E20LMDETZ–SL) DBM–25S 1 RD 11 SD 1 FG 14 2 0V 12 0V 2 SD 15 3 DR 13 ER 3 RD 16 4 0V 14 0V 4 RS 17 5 CS 15 RS 5 CS 18 6 0V 16 0V 6 DR 19 7 CD 17 7 SG 20 ER 8 0V 18 8 CD 21 9 19 9 2
- Page 291B–63833EN/03 13. CONNECTION TO OTHER NETWORKS 13 CONNECTION TO OTHER NETWORKS The Series 0i can be connected to the following networks. For an explanation of how to make the connection, refer to the manuals listed below: Manual title Manual code FANUC Data Server Operator’s Manual B–62694EN FANUC Et
- Page 29214. CNC DISPLAY UNIT WITH PC FUNCTIONS B–63833EN/03 14 CNC DISPLAY UNIT WITH PC FUNCTIONS 278
- Page 293B–63833EN/03 14. CNC DISPLAY UNIT WITH PC FUNCTIONS 14.1 The CNC display unit with PC functions is on an IBM PC compatible panel computer. Connecting the CNC display unit with PC functions to OVERVIEW an Series 0i system via a high–speed optical fiber (high–speed serial bus) provides the system with
- Page 29414. CNC DISPLAY UNIT WITH PC FUNCTIONS B–63833EN/03 14.3 CONNECTION Connection with the CNC display unit with PC functions ÅÅÅÅ ÅÅÅÅ ÅÅÅÅÅ ÅÅÅÅÅ ÅÅÅÅÅÅ ÅÅÅÅÅÅ FA ÅÅÅÅ ÅÅÅÅÅ ÅÅÅÅÅÅ Control CNC display typewriter– unit unit with PC style ÅÅÅÅ ÅÅÅÅÅ ÅÅÅÅÅÅ functions keyboard ÅÅÅÅ ÅÅÅÅ ÅÅÅÅÅÅ ÅÅÅÅÅÅ ÅÅÅ
- Page 295B–63833EN/03 14. CNC DISPLAY UNIT WITH PC FUNCTIONS 14.4 GENERAL CONNECTION DIAGRAMS 14.4.1 CNC Display Unit with PC Functions Having Neither Soft Keys nor a Touch Panel 281
- Page 29614. CNC DISPLAY UNIT WITH PC FUNCTIONS B–63833EN/03 Ô Ô : Optical link Module & Cable : AMP(Dynamic) Õ : AMP(mini–DIN6pins) Õ CNC Control Unit Ÿ : HONDA TSUSHIN (PCR 20pins) POWER SUPPLY : HIROSE DENKI(Flat Cable34pins) HSSB I/F BOARD : HIROSE DENKI(Flat Cable40pins) HSSB(COP7) : AMP(EI Series 4pins
- Page 297B–63833EN/03 14. CNC DISPLAY UNIT WITH PC FUNCTIONS 14.4.2 CNC Display Unit with PC Functions Having Soft Keys but No Touch Panel CNC Control Unit Ô : Optical link Module & Cable Ô : AMP(Dynamic) ( POWER SUPPLY : AMP(mini–DIN6pins) HSSB I/F BOARD HSSB(COP7) ) ( ) : HONDA TSUSHIN (PCR 20pins) Ž : HIR
- Page 29814. CNC DISPLAY UNIT WITH PC FUNCTIONS B–63833EN/03 14.4.3 CNC Display Unit with PC Functions Having a Touch Panel but No Soft Key Ô CNC Control : Optical link Module & Cable Ô POWER SUPPLY : AMP(Dynamic) ’ : AMP(mini–DIN6pins) . ’ HSSB I/F BOARD HSSB(COP7) : HONDA TSUSHIN (PCR 20pins) . # : HIROSE
- Page 299B–63833EN/03 14. CNC DISPLAY UNIT WITH PC FUNCTIONS 14.4.4 CNC Display Unit with PC Functions Having a Touch Panel and Soft Key ÔÔ CNC Control Unit : Optical link Module & Cable ÔÔ POWER SUPPLY : AMP(Dynamic) ’’ : AMP(mini–DIN6pins) .. ’’ HSSB I/F BOARD HSSB(COP7) : HONDA TSUSHIN (PCR 20pins) .. ’ #
- Page 30014. CNC DISPLAY UNIT WITH PC FUNCTIONS B–63833EN/03 14.5 SPECIFICATIONS 14.5.1 When CNC display unit with PC functions is used, the following environmental conditions (as measured top of the CNC display unit with Installation PC functions inside the cabinet) must be ensured for the CNC display unit
- Page 301B–63833EN/03 14. CNC DISPLAY UNIT WITH PC FUNCTIONS Some development or maintenance options may not satisfy the above specifications. *3 Measure for Noise : Please measure for noise sufficiently referring to Section 3.5. 14.5.2 (1) Input power Power Supply (a) Specification Specification To use the
- Page 30214. CNC DISPLAY UNIT WITH PC FUNCTIONS B–63833EN/03 NOTE Above power consumption is reference. If peripherals are connected or PCI extended boards are mounted, the power consumption will increase. Also, please consider the cabinet design and the cooling method which is most suitable to the total pow
- Page 303B–63833EN/03 14. CNC DISPLAY UNIT WITH PC FUNCTIONS 14.6 The following three spaces are required around the CNC display unit with PC functions. INSTALLATION A: Space for connecting cables. SPACE Also, If you wish to exchange a battery or a fuse without removing CNC display unit with PC functions fro
- Page 30414. CNC DISPLAY UNIT WITH PC FUNCTIONS B–63833EN/03 14.6.2 Basic Unit 12.1″ LCD Type 60 In case that PCI Extension Board Fitting /// /////////////// Plate is ordered. 20 ///C /////////////// /// /////////////// C /// ///////// /// /// A ///////// ///////// A /// ///////// /// ////// ///////// /// //
- Page 305B–63833EN/03 14. CNC DISPLAY UNIT WITH PC FUNCTIONS 14.6.4 The HDD unit is mounted on the backside of the MDI or the FA HDD Unit Full–Keyboard. Reserve space C in the above figure. And reserve space for connecting cables of HDD signal, HDD power, FAN power , and MDI/FA full keyboard signal too. The
- Page 30614. CNC DISPLAY UNIT WITH PC FUNCTIONS B–63833EN/03 14.7 PERIPHERAL EQUIPMENT AND CONNECTION 14.7.1 Connector Layout Diagram PCMCIA Card slot (Display side) Show from CNP1 The back side CNP2 CN2B CN2 JD33 JD46 JD9 CD32B CD32A CP5 COP7 CNH3 CD34 CN7 Connector Number Connector Name Function CP5 +24V I
- Page 307B–63833EN/03 14. CNC DISPLAY UNIT WITH PC FUNCTIONS 14.7.2 Main Power Supply Input CNC display unit with PC functions CP5 1 +24V 2 0V +24 VDC input 3 AMP 2–178288–3 (CASE) 1–175218–5 (CONTACT) (1) Cable connection 1 +24V +24V 2 0V 0V (2) Recommended cable conductor Use a cable whose conductor is not
- Page 30814. CNC DISPLAY UNIT WITH PC FUNCTIONS B–63833EN/03 14.7.3 Floppy Disk Drive (Signal and Power Supply) CNC display unit with PC functions Panel–mount type 3.5″ floppy disk drive CD34 1 0V 2 DENSEL 1 0V 2 DENSEL 3 0V 4 3 0V 4 5 0V 6 5 0V 6 7 0V 8 :INDEX 7 0V 8 :INDEX 9 0V 10 :MT0 9 0V 10 :DS0 11 0V 1
- Page 309B–63833EN/03 14. CNC DISPLAY UNIT WITH PC FUNCTIONS (1) Cable connection 1 1 1 0V 0V 2 2 2 DENSEL DENSEL 3 3 3 0V 0V 4 4 4 (NC) (NC) 5 5 5 0V 0V 6 6 6 (NC) (NC) 7 7 7 0V 0V 8 8 8 *INDEX *INDEX 9 9 9 0V 0V 10 10 16 *MT0 *0S0 11 11 15 0V 0V 12 12 14 *DS1 *DS1 13 13 13 0V 0V 14 14 12 *DS0 (RES) 15 15 1
- Page 31014. CNC DISPLAY UNIT WITH PC FUNCTIONS B–63833EN/03 14.7.3.1 When using this unit on the machine, observe the following cautions: Operating environment (1) Dust Because the CNC display unit with PC functions is not covered with panels, except for the front door section, it must be enclosed in a seal
- Page 311B–63833EN/03 14. CNC DISPLAY UNIT WITH PC FUNCTIONS 14.7.4 High–speed Serial Bus (HSSB) CNC display unit with PC functions HSSB interface board (CNC side) Optical fiber cable COP7 COP7 1) Recommended cables (optical fiber cables) A66L–6001–0026#L1R003: Cable length = 1 m A66L–6001–0026#L3R003: Cable
- Page 31214. CNC DISPLAY UNIT WITH PC FUNCTIONS B–63833EN/03 NOTE 1 The high–speed serial bus cannot use an optical fiber cable designed for the FANUC I/O link, FSSB extension line, or serial spindle. 2 Machine tool builders cannot cut or extend optical fiber cables. Select an appropriate type from the above
- Page 313B–63833EN/03 14. CNC DISPLAY UNIT WITH PC FUNCTIONS A02B–0236–C132#EC : FA Full Keyboard (English) for 12.1” LCD type A08B–0082–C150#JC : FA Full Keyboard (Japanese) for 15.0” LCD type A08B–0082–C150#EC : FA Full Keyboard (English) for 15.0” LCD type A08B–0082–C151#JC : FA Full Keyboard (Japanese) f
- Page 31414. CNC DISPLAY UNIT WITH PC FUNCTIONS B–63833EN/03 14.7.6 Mouse CNC display unit with PC functions Mouse (commercial model) CD32B (mini DIN6) Alternatively, FA full keyboard Mouse (commercial model) 1) Recommended mouse A86L–0001–0212 Standard PS/2 mouse (commercial model): for development and main
- Page 315B–63833EN/03 14. CNC DISPLAY UNIT WITH PC FUNCTIONS 14.7.7 Centronics Parallel Port CNC display unit with PC functions Example) Printer JD9 (PCR–E20MD) 1 STD0 11 :STB 1 :STB 19 0V 2 STD1 12 0V 2 STD 20 0V 3 STD2 13 :AFD 3 STD1 21 0V 4 STD3 14 0V 4 STD2 22 0V 5 STD4 15 :INIT 5 STD3 23 0V 6 STD5 16 0V
- Page 31614. CNC DISPLAY UNIT WITH PC FUNCTIONS B–63833EN/03 14.7.8 Serial Port 2 + USB CNC display unit with PC functions ex.) Host Computer JD46 (PCR–E20MD) (DBM–25S) 1 RD 11 SD 1 FG 14 2 0V 12 USB1_0V 2 SD 15 3 DR 13 ER 3 RD 16 4 0V 14 USB2_0V 4 RS 17 5 CS 15 RS 5 CS 18 6 USB1+ 16 USB2+ 6 DR 19 7 CD 17 US
- Page 317B–63833EN/03 14. CNC DISPLAY UNIT WITH PC FUNCTIONS NOTE 1 The figure shows a sample host computer interface and USB. Design the cable to suit the interface of the actual device to be connected. 2 The +24V pins of the interface for CNC display unit with PC functions shown above can be used only with
- Page 31814. CNC DISPLAY UNIT WITH PC FUNCTIONS B–63833EN/03 14.7.9 For an CNC display unit with PC functions having a touch panel, the Serial Port 1 touch panel controller uses serial port 1. So this connector cannot be used for any other purpose. The touch panel controller is connected, using a dedicated c
- Page 319B–63833EN/03 14. CNC DISPLAY UNIT WITH PC FUNCTIONS NOTE 1 he interface on the host computer side shown above is only an example. Design an interface cable according to the specification of the host computer with which it is used. 2 The +24 V lines in the interface on the CNC display unit with PC fu
- Page 32014. CNC DISPLAY UNIT WITH PC FUNCTIONS B–63833EN/03 14.7.11 PCMCIA Card CNC display unit with PC functions Door PCMCIA Card slot Back side PCMCIA card (Type I, Type II) NOTE 1 Only Type I or Type II PCMCIA card is usable. The following card cannot be used. – Card–bus card – Dual mode card (Card–bus
- Page 321B–63833EN/03 14. CNC DISPLAY UNIT WITH PC FUNCTIONS 14.7.12 Hard Disk Unit 1) Cable Connection Connect HDD Signal cable to CNH3. Connect HDD Power cable to CN2B. Connect FAN cable to CN7. Each cables are connected to HDD unit at exfactory. 2) Cable Length HDD Power Cable: 50cm HDD Signal Cable: 40cm
- Page 32214. CNC DISPLAY UNIT WITH PC FUNCTIONS B–63833EN/03 14.8 PCI EXPANSION BOARD 14.8.1 (1) Usable boards Installation Method Up to two PCI expansion boards (shown below) can be used in CNC display unit with PC functions. PCI Specification 2.1 compliant 32 bits, 33 MHz, +5 V The external dimensions of t
- Page 323B–63833EN/03 14. CNC DISPLAY UNIT WITH PC FUNCTIONS Screw Point (B) Vibration Proof Fittings Press Down PCI Extension Board Slot 1 Slot 2 Screw Point (A) (3) Method of mounting PCI extension board Refer to the specifications of PCI extension board for the environmental conditions for installation of
- Page 324
- Page 325APPENDI
- Page 326
- Page 327B–63833EN/03 A. EXTERNAL DIMENSIONS OF EACH UNIT A EXTERNAL DIMENSIONS OF EACH UNIT Name Specification Fig., No. Series 0i Mate–B basic unit (1–slot) A02B–0301–B801 Fig. U1 Series 0i–B basic unit (2–slot) A02B–0299–B802 Fig. U2 English display MDI A02B–0299–C041#M Symbol display MDI A02B–0299–C041#M
- Page 328A. EXTERNAL DIMENSIONS OF EACH UNIT B–63833EN/03 Name Specification Fig., No. Full keyboard (for debugging purposes) A86L–0001–0210, 0211 Fig. U13 Mouse (for debugging purposes) A86L–0001–0212 Fig. U14 Floppy disk unit (for debugging purposes) A02B–0207–C008 Fig. U15 HSSB interface board type 2 (1CH
- Page 329B–63833EN/03 A. EXTERNAL DIMENSIONS OF EACH UNIT Slot 1 Memory card Weight : 0.7kg The stated weight does not include printed–circuit boards inserted in the slots Fig.U1 Series 0i Mate–B basic unit (1–slot) Specification No. : A02B–0301–B801 315
- Page 330A. EXTERNAL DIMENSIONS OF EACH UNIT B–63833EN/03 172 10 112 S=1/1 172 56 56 Main board I/O board 380 360 7 S=1/1 2 12 Weight : 3.0kg Fig.U2 Series 0i–B basic unit (2–slot) Specification No. : A02B–0299–B802 316
- Page 331B–63833EN/03 A. EXTERNAL DIMENSIONS OF EACH UNIT Panel cut drawing 220 max Weight : 4.1kg At the rear of the metal plate of the panel, the area within 8 mm of the perimeter is left unpainted Fig.U3 9″ monochrome CRT/MDI (small size) Specification No. : A02B–0299–C041#M, #T (English display MDI) A02B
- Page 332A. EXTERNAL DIMENSIONS OF EACH UNIT B–63833EN/03 Weight : 2.2kg Panel cut drawing At the rear of the metal plate of the panel, the area within 8 mm of the perimeter is left unpainted Fig.U4 7.2″ STN monochrome LCD/MDI unit Specification No. : A02B–0299–C071, C076#M, #T (English display MDI) A02B–029
- Page 333B–63833EN/03 A. EXTERNAL DIMENSIONS OF EACH UNIT Panel cut drawing Weight : 2.3kg At the rear of the metal plate of the panel, the area within 8 mm of the perimeter is left unpainted Fig.U5 8.4″ LCD/MDI (small size, color) Specification No. : A02B–0299–C081#M, #T (English display MDI) A02B–0299–C081
- Page 334A. EXTERNAL DIMENSIONS OF EACH UNIT B–63833EN/03 Weight : 2.1kg At the rear of the metal plate of the panel, the area within 8 mm of the perimeter is left unpainted Panel cut drawing Fig.U6 8.4″ TFT color LCD unit Specification No. : A02B–0299–C080 320
- Page 335B–63833EN/03 Fig.U7 10.4″ TFT color LCD unit 321 Specification No. : A02B–0299–C060 Weight : 2.4kg At the rear of the metal plate of the panel, the area within 8 mm of the perimeter is left unpainted Panel cut drawing A. EXTERNAL DIMENSIONS OF EACH UNIT
- Page 336A. EXTERNAL DIMENSIONS OF EACH UNIT B–63833EN/03 Weight : 0.6kg Panel cut drawing At the rear of the metal plate of the panel, the area within 8 mm of the perimeter is left unpainted Fig.U8 Stand–alone type MDI unit (small size) Specification No. : A02B–0279–C120#MA, #TA (English display MDI) A02B–0
- Page 337B–63833EN/03 A. EXTERNAL DIMENSIONS OF EACH UNIT Weight : 1.1kg Panel cut drawing At the rear of the metal plate of the panel, the area within 8 mm of the perimeter is left unpainted Fig.U9 Stand–alone type MDI unit (full–key) Specification No. : A02B–0279–C122#MA, #TA (English display MDI) A02B–027
- Page 338A. EXTERNAL DIMENSIONS OF EACH UNIT B–63833EN/03 125 (With PCI Extension Board Fitting Plate) 60 (Without PCI Extension Board Fitting Plate) 25 2 20 Upper View Paint Masking (Mounting side of this plate is unpainted in 8mm 4–φ4 width from the edge ) 290 5 Maximum PCI card defined at Connecting 4. 22
- Page 339B–63833EN/03 A. EXTERNAL DIMENSIONS OF EACH UNIT 125 (With PCI Extension Board Fitting Plate) 60 (Without PCI Extension Board Fitting Plate) 30 2 25 Upper View Paint Masking (Mounting side of this plate is unpainted in 8mm 340 width from the edge ) 5 280 270 6–f4 57 (From the outside of the plate) 5
- Page 340A. EXTERNAL DIMENSIONS OF EACH UNIT B–63833EN/03 125 (With PCI Extension Board Fitting Plate) 60 (Without PCI Extension Board Fitting Plate) 35 2 30 Paint Masking Upper View (Mounting side of this plate is unpainted in 8mm 400 width from the edge ) 5 155 320 155 77 (From the outside of the plate) 8–
- Page 341B–63833EN/03 A. EXTERNAL DIMENSIONS OF EACH UNIT Refer to Fig.U12 (d) about panel cutting. b: M5 10mm (Frame GND) Weight: 2.9 kg (Unit: mm) 2 10.7 50.5 290 43.5 220 40 24.5 45.5 14.5 9 42.4 70max. 5 9 5 * The depth dimension assumes that the HDD unit is installed. 65 51.8 87.6 83.1 63 b 34 54 177 35
- Page 342A. EXTERNAL DIMENSIONS OF EACH UNIT B–63833EN/03 Refer to Fig.U12 (d) about panel cutting. b: M5 10mm (Frame GND) Weight: 2.7 kg (Unit: mm) 2 10.7 230 50.5 43.5 220 40 24.5 45.5 14.5 4–f4 9 42.4 5 9 70max. 5 * The depth dimension assumes that the HDD unit is installed. 35 21.8 57.6 53.1 63 b 16 24 1
- Page 343B–63833EN/03 A. EXTERNAL DIMENSIONS OF EACH UNIT 1550"40 250"40 2 290 20 60.6 220 10 6 4–φ5 5 32 a 5 a a: M5 10mm b: M5 10mm (Frame GND) 60 56 a 30 b Weight : 3.5 kg 40 a (Unit :mm) 20 Fig.U12 (a) FA Full Keyboard 10.4″ LCD Type Specification No. : A02B–0236–C131#JC,A02B–0236–C131#EC 329
- Page 344A. EXTERNAL DIMENSIONS OF EACH UNIT B–63833EN/03 1550"40 250"40 2 340 20 60.6 220 10 6 6–φ5 5 32 a 5 a a: M5 10mm b: M5 10mm (Frame GND) 110 54 a 30 b a 40 Weight : 3.7 kg (Unit :mm) 20 Fig.U12 (b) FA Full Keyboard 12.1″ LCD Type Specification No. : A02B–0236–C132#JC,A02B–0236–C132#EC 330
- Page 345B–63833EN/03 A. EXTERNAL DIMENSIONS OF EACH UNIT 1550"40 250"40 2 400 60.6 20 220 6–φ5 26 34 5 35 5.5 13 5 4-R5 Blank Panel 140 155 86 Hole of 179 Connector 168 27 Panel 59 b 20 80 5.5 2–φ5 Weight :3.9 kg Unpaint rear side (Unit :mm) (φ10) b: M5 10mm (Frame GND) Fig.U12 (c) FA Full Keyboard 15.0″ LC
- Page 346A. EXTERNAL DIMENSIONS OF EACH UNIT B–63833EN/03 280 - FA Full Keyboard 10.4" LCD Type 4–M3 210 HOLE 204 274 330 - FA Full Keyboard 12.1" LCD Type 6–M3 210 HOLE 204 162 324 390 - FA Full Keyboard 15.0" LCD Type 6–M3 HOLE 204 210 Note: Refer to each section of outline about panel cutting of Basic Uni
- Page 347B–63833EN/03 A. EXTERNAL DIMENSIONS OF EACH UNIT Full Keyboard 101 key (A86L–0001–0210) (Unit : mm) (Unit : mm) Full Keyboard 106key (A86L–0001–0211) Note: These units can be used only during application development and maintenance ,and this is not dust proof. .Ambient temperature during operation i
- Page 348A. EXTERNAL DIMENSIONS OF EACH UNIT B–63833EN/03 Cap Ball 1800"190 Name Plate of Unit (Unit : mm) Note: This unit can be used only during application development and maintenance ,and this is not dust proof. .Ambient temperature during operation is 0_C–40_C. Fig.U14 Mouse Specification No. : A86L–000
- Page 349B–63833EN/03 A. EXTERNAL DIMENSIONS OF EACH UNIT 5 4–φ3.6 FDD J2 150 140 ACRYLIC WINDOW 104 J1 5 5 70 5 145 80 (Unit : mm) Fornt View Side View 4–M3 140 134 64 (HOLE) 70 Panel Cutting Mounting direction When using the floppy disk unit attached to the machine, mount the floppy disk unit in one of the
- Page 350A. EXTERNAL DIMENSIONS OF EACH UNIT B–63833EN/03 –0582 –0583 Weight: 0.2 kg Fig.U16 (a) High–speed serial bus interface board type 2 (PC) (ISA bus version) Specification No. : A20B–8001–0583 (1 CH) A20B–8001–0582 (2 CH) 0961 0960 Weight: 0.1 kg Fig.U16 (b) Interface Board for Personal Computer (PCI
- Page 351B–63833EN/03 A. EXTERNAL DIMENSIONS OF EACH UNIT MS connector: MS3102A–20–29P Fig.U17 α position coder Specification No.: A860–0309–T302 (10000 min–1 maximum) 337
- Page 352A. EXTERNAL DIMENSIONS OF EACH UNIT B–63833EN/03 8.35 f80.0 f55.0 50.0 30.0 M4X8.0 60.0 On the f72 circumference PULSE GENERATOR 11.0 FANUC LTD 0V 5V A B M3 screw terminal 120.0° Fig.U18 Manual pulse generator Specification No. : A860–0202–T001 338
- Page 353B–63833EN/03 A. EXTERNAL DIMENSIONS OF EACH UNIT (1) A860–0202–T004 to T009 90 38.0 25 Y Z X1 X10X100 X 4 M3 screw terminal 140 100.0 39.0 M3 screw terminal (2) A860–0202–T010 to T015 90 38.0 25 Z 4 X1 X10 X100 Y X 5 M3 screw terminal 140 100.0 39.0 M3 screw terminal Fig.U19 Pendant type manual puls
- Page 354A. EXTERNAL DIMENSIONS OF EACH UNIT B–63833EN/03 COP10B COP10A CP11 JF101(JF105) JF102(JF106) JF103(JF107) JF104(JF108) JA4A The connector names in parentheses are for an expansion unit. The expansion unit does not have connectors CP11, JA4A, COP10A, and COP10B. Fig.U20 External dimensions of separa
- Page 355B–63833EN/03 A. EXTERNAL DIMENSIONS OF EACH UNIT Negative polarity indication 103 4–M4 counter Positive polarity indication sinking Plus terminal with 3–M3 screw holes 103 Minus terminal 93 with 3–M3 screw holes FANUC 40 4–f4.3 mounting hole Arrow view A 14.1 106.3 92.2 13.2 78 78 Note) The battery
- Page 356A. EXTERNAL DIMENSIONS OF EACH UNIT B–63833EN/03 Main unit Cover 103 115 M4 tap × 4 70 81 93 5 Mounting panel hole drilling 13.5 47 Mounting hole (countersink) 145 The battery unit is fitted with a 14–m battery cable. Fig. U22 External dimensions of external CNC battery unit 342
- Page 357B–63833EN/03 A. EXTERNAL DIMENSIONS OF EACH UNIT 80 5 13 5 125 At the rear of the metal plate of the panel, the area within 8 mm of the perimeter is left unpainted 80 Dimensions of panel cutting 115 100 20 4–M3 Fig.U23 Punch panel (wide width type) Specification No. : A02B–0120–C181 (Cable length :
- Page 358A. EXTERNAL DIMENSIONS OF EACH UNIT B–63833EN/03 40 20 13 5 125 5 At the rear of the metal plate of the panel, the area within 8 mm of the perimeter is left unpainted Dimensions of panel cutting 115 100 20 2–M3 Fig.U24 Punch panel (narrow width type) Specification No. : A02B–0120–C191 (Cable length
- Page 359B–63833EN/03 A. EXTERNAL DIMENSIONS OF EACH UNIT 150 Unit = mm Panel cut drawing Weight: 1.6kg Fig.U25 Machine operator’s panel (Main panel B) Specification No. : A02B–0236–C231 345
- Page 360A. EXTERNAL DIMENSIONS OF EACH UNIT B–63833EN/03 Earth stud (M4) 6–φ4 5 80 70 60 5 5 280 5 290 70 270 6–M3 140 140 70 66 274 Unit : mm Weight : 0.6kg Panel cut drawing Fig.U26 Machine operator’s panel (Sub panel A) Specification No. : A02B–0236–C232 346
- Page 361B–63833EN/03 A. EXTERNAL DIMENSIONS OF EACH UNIT Earth stud (M4) Unit = mm Weight: 0.6kg Panel cut drawing Fig.U27 Machine operator’s panel (Sub panel B1) Specification No. : A02B–0236–C235 347
- Page 362A. EXTERNAL DIMENSIONS OF EACH UNIT Panel cut drawing Fig.U28 7.2″ STN monochrome LCD unit 348 Specification No. : A02B–0299–C070, C075 Weight : 1.7kg At the rear of the metal plate of the panel, the area within 8 mm of the perimeter is left unpainted. B–63833EN/03
- Page 363B–63833EN/03 A. EXTERNAL DIMENSIONS OF EACH UNIT Panel cut drawing Weight : 0.8kg At the rear of the metal plate of the panel, the area within 8 mm of the perimeter is left unpainted. Fig.U29 Separate type MDI unit (full–key) (for 7.2″ LCD/8.4″ LCD) Specification No. : A02B–0210–C122#MA, #TA (Englis
- Page 364A. EXTERNAL DIMENSIONS OF EACH UNIT B–63833EN/03 Weight : 1.0kg Panel cut drawing At the rear of the metal plate of the panel, the area within 8 mm of the perimeter is left unpainted. Fig.U30 Separate type MDI unit (full–key) Specification No. : A02B–0279–C121#MA, #TA (English display MDI) A02B–0279
- Page 365B–63833EN/03 A. EXTERNAL DIMENSIONS OF EACH UNIT Connectors Fig. title Specification No. Fig. No. PCR connector (soldering type) PCR–E20FS Fig.C1 (a) FI40 connector FI40–2015S Fig.C1 (b) Connector case (HONDA PCR type) PCR–V20LA/PCR–V20LB Fig.C2 (a) Connector case (HIROSE FI type) FI–20–CV Fig.C2 (b
- Page 366A. EXTERNAL DIMENSIONS OF EACH UNIT B–63833EN/03 TYPE : HONDA PCR–E20FS (SOLDERING TYPE) USAGE : GENERAL MATING HOUSING : HONDA PCR–V20LA (PLASTIC) A n 2 1.27 1 7.3 n n)1 2 Display 7 HONDA 15.1 1.27 B A B PCR–E20FS 21.65 11.43 Fig.C1 (a) PCR connector (soldering type) 352
- Page 367B–63833EN/03 A. EXTERNAL DIMENSIONS OF EACH UNIT TYPE : HIROSE FI40–2015S USAGE : PULSE CODER INTERFACE LINEAR SCALE INTERFACE MPG INTERFACE MATING/HOUSING : HIROSE FI–20–CV 16.25 15_ 11.43 1.27 Note This connector does not 10 9 8 7 6 5 4 3 2 1 have contacts for positions 5.5 11,13,15,17, and 19. 2.
- Page 368A. EXTERNAL DIMENSIONS OF EACH UNIT B–63833EN/03 TYPE : HONDA PCR–V20LA (for 6 dia. cable) USAGE : GENERAL 9.5 21 11.4 (1) HONDA (2) 37 30 (3) (6) (5) (4) (1) (2) Case (3) Cable clamp (4) Lock bracket (5) Lock lever (6) Set screw for cable clamp Fig.C2 (a) Connector case (HONDA PCR type) 354
- Page 369B–63833EN/03 A. EXTERNAL DIMENSIONS OF EACH UNIT TYPE : HIROSE FI–20–CV USAGE : PULSE CODER INTERFACE LINEAR SCALE INTERFACE MANUAL PULSE GENERATOR INTERFACE (1) (2) Case (3) Lock bracket (4) Lock lever (5) Cable clamp (6) Set screw for cable clamp 21±0.3 11.5±0.3 9.5±0.2 (5) (6) (4) 37"0.5 17.5"0.3
- Page 370A. EXTERNAL DIMENSIONS OF EACH UNIT B–63833EN/03 TYPE : FUJITSU FCN–240C20–Y/S (for 5.8 dia. cable) USAGE : GENERAL 9.5 21 11.4 (2) F C020–02 37 30 Cable clamp Screw Lock lever Fig.C2 (c) Connector case (FUJITSU FCN type) 356
- Page 371B–63833EN/03 A. EXTERNAL DIMENSIONS OF EACH UNIT Fig.C2 (d) Connector case (PCR type (Hirose Electric)) 357
- Page 372A. EXTERNAL DIMENSIONS OF EACH UNIT B–63833EN/03 TYPE : AMP1–178128–3 (25.5) Circuit No. DIMENSION 3 2 1 AMP D–3 X 22.8 16.3 19.24 10.16 0.6 5.08 3.1 4.05 6.55 7.15 3 2 1 Circuit No. Fig.C3 (a) AMP connector (1) 358
- Page 373B–63833EN/03 A. EXTERNAL DIMENSIONS OF EACH UNIT TYPE : AMP2–178128–3 Circuit No. (29.7) DIMENSION 3 2 1 AMP D–3 22.8 " 0.3 Y 16.3" 0.3 (19.24) 0.6 " 0.3 10.16 5.08 " 0.3 " 0.3 3.1 4.05 6.55 7.15 3 2 1 Cricuit No. Fig. C3 (b) AMP connector (2) 359
- Page 374A. EXTERNAL DIMENSIONS OF EACH UNIT B–63833EN/03 TYPE : AMP1–178288–3 USAGE : POWER SUPPLY UNIT CP1A 3 +24V INPUT 2 0V 1 +24V (22.96) Circuit No. DIMENSION 3 2 1 AMP D–3 X 22.8 16.3 16.7 7.62 0.6 3.81 3.1 4.05 6.55 7.15 3 2 1 Circuit No. Fig.C3 (c) AMPconnector (3) 360
- Page 375B–63833EN/03 A. EXTERNAL DIMENSIONS OF EACH UNIT TYPE : AMP2–178288–3 USAGE : POWER CP1B 3 +24V OUTPUT 2 0V 1 +24V DIMENSION Circuit No. 0.6 6.55 7.15 3 2 1 Circuit No. Fig.C3 (d) AMP connector (4) 361
- Page 376A. EXTERNAL DIMENSIONS OF EACH UNIT B–63833EN/03 SEPARATE : AMP1–175218–2(Gold coated) AMP1–175218–5(Tin coated) REEL : AMP1–175196–2(Gold coated) AMP1–175196–5(Tin coated) WIRE : AWG 16, 18, 20 (21.8) A–A ±0.4 2.9 2.9 " 0.5 1 In case of reel ±0.5 3 B–B 17.8 ±0.4 4.2 (9.3) (2.5) B ±0.2 A 2.9 " 0.5 "
- Page 377B–63833EN/03 A. EXTERNAL DIMENSIONS OF EACH UNIT (2) (4) (1) (3) C (5) A (D) (B) Symbol Number of Specification A (B) C (D) terminals MR–20LMH (Plug) 39.3 44.9 39.8 17 20 MR–20LFH (Jack) MR–50LMH (Plug) 67.9 73.5 44.8 18 50 MR–50LFH (Jack) Symbol Name Outer diameter of the cable 1 Connector cover MR
- Page 378A. EXTERNAL DIMENSIONS OF EACH UNIT B–63833EN/03 External dimensions of 50–pin connector Fig.C4 (b) Honda connector (angled–type case) 364
- Page 379B–63833EN/03 A. EXTERNAL DIMENSIONS OF EACH UNIT 2–M2 13 A B (1) 2.4 18.1 6 (2) 8.5 (3) 14 15 16 17 18 19 20 HONDA 8 9 10 11 12 13 1 2 3 4 5 6 7 Number of A B terminals MR–20RMH 32.8 27.8 20 MR–50RHF 61.4 56.4 50 Symbol Name 1 Cable clamp 2 Screw 2.6dia.×8 3 Connector (MR–20,–50MH) Fig.C4 (c) HONDA
- Page 380A. EXTERNAL DIMENSIONS OF EACH UNIT B–63833EN/03 2–M2 13 B A (1) 2.4 19.9 8.4 10.9 (2) (3) 1 2 3 4 5 6 7 HONDA 8 9 10 11 12 13 14 15 16 17 18 19 20 Number of A B terminals MR–20RMH 32.8 27.8 20 MR–50RMH 61.4 56.4 50 Symbol Name 1 Cable clamp 2 Screw 2.6dia.×8 3 Connector ( MR–20,– 50FH) Fig.C4 (d) H
- Page 381B–63833EN/03 A. EXTERNAL DIMENSIONS OF EACH UNIT 33 34 35 36 37 38 39 40 41 42 43 44 45 46 47 48 49 50 HONDA MR–50MH 19 20 21 22 23 24 25 26 27 28 29 30 31 32 (50–core,plug) 1 2 3 4 5 6 7 8 9 10 11 12 13 14 15 16 17 18 1 2 3 4 5 6 7 8 9 10 11 12 13 14 15 16 17 18 MR–50FH HONDA 19 20 21 22 23 24 25 2
- Page 382A. EXTERNAL DIMENSIONS OF EACH UNIT B–63833EN/03 6 5 5.08 38 max. 48 max. 4 3 2 1 1 7 max. 24.9 Manufacturer : FCI Japan Corp. Specification Name (Connector maker Remarks number) Connector housing for cable SMS6PN–5 Brown For details on tools (Crimp type) RC16M–23T3 required for crimp Contact termin
- Page 383B–63833EN/03 A. EXTERNAL DIMENSIONS OF EACH UNIT CONNECTOR FOR FLAT CABLE (HIROSE ELEC. CO.) HIF3BB 15.6 14.4 1.27 1.27 1.09 1.27 Section A–A’ Section B–B’ ASS’Y DIAGRAM MAIN BODY PROTECTOR CRAMP A A A 6.0 2.54 A A’ B D 3.6 6.0 6.0 1.27 2.54 B’ 3.81 B D 3.8 :1 3.5 :2 :3 5.1 7.0 3.5 7.0 10.5 0.3 0.95
- Page 384A. EXTERNAL DIMENSIONS OF EACH UNIT B–63833EN/03 +0.2 18 2 (pitch) ±0.15 13 0 20.5 –0.3 +0.3 21.6 0 Fig.C7 (a) Connector (Japan Aviation Electronics)(for MDI) 370
- Page 385B–63833EN/03 A. EXTERNAL DIMENSIONS OF EACH UNIT Section A–A Contact position Detailed contact diagram Excluding the crimp terminal Product name Fig.C7 (b) Contact (Japan Aviation Electronics)(for MDI) 371
- Page 386A. EXTERNAL DIMENSIONS OF EACH UNIT B–63833EN/03 H J A 53.0 D 7.8 G 10.7 B 38.3 E 12.6 H 1.2 C 47.0 F 41.3 J 0.8 A C A–A cross section B F A 10 E D G 6.1 10 A 10 2–3.05f 10.8 Fig.C8 (a) Punch panel connector for reader/puncher interface Small round M2.6 P0.45 screw Interlock screw head screw 1.2groo
- Page 387B–63833EN/03 A. EXTERNAL DIMENSIONS OF EACH UNIT Honda MR type, 50 pins, male, connection printed circuit board soldering type connector Type No. Honda Tsushin Kogyo Co., Ltd. MRH–50FD Pin configuration of Honda MR connector, 50 pins, male 19 Viewed from the connector side Fig.C9 Honda connector 373
- Page 388B. 20–PIN INTERFACE CONNECTORS AND CABLES B–63833EN/03 B 20–PIN INTERFACE CONNECTORS AND CABLES 374
- Page 389B–63833EN/03 B. 20–PIN INTERFACE CONNECTORS AND CABLES B.1 This section explains the recommended (FANUC–approved) connectors for the 20–pin interface, used with the following target models, and the OVERVIEW corresponding cables. B.2 Model : PCR–EV20MDT produced by Honda Tsushin or 52618–2011 produce
- Page 390B. 20–PIN INTERFACE CONNECTORS AND CABLES B–63833EN/03 B.3 Cable connectors consist of a connector main body and housing. The models listed below are available. Those connectors not marked with an CABLE asterisk are currently being mass–produced as manufacturer’s standard CONNECTORS models. Those ma
- Page 391B–63833EN/03 B. 20–PIN INTERFACE CONNECTORS AND CABLES Cable Connectors Strand wire press–mount connector : With this connector, #28AWG wires are press–connected to each pin at the same time. The cost of producing a cable/connector assembly with this connector model is much lower than with connector
- Page 392B. 20–PIN INTERFACE CONNECTORS AND CABLES B–63833EN/03 B.4 RECOMMENDED CONNECTORS, APPLICABLE HOUSINGS, AND CABLES Table B.4 Recommended connectors, applicable housings, and cables Connector name FANUC–approved FANUC–approved Compatible cable (cable diameter) referenced in the connector housing FANU
- Page 393B–63833EN/03 B. 20–PIN INTERFACE CONNECTORS AND CABLES Press–mount type connector assembly tools and jigs Connector model FANUC–approved Press–mounting referenced in the connector Wire forming tool Remark tool Connection Manual (manufacturer) PCR–E20FA PCR–E20FA PCS–K2A FHPT–918A Low cost (Honda Tsu
- Page 394B. 20–PIN INTERFACE CONNECTORS AND CABLES B–63833EN/03 Materials for cable Machine tool builders are required to manufacture or procure the assemblies materials for the cable assemblies to be used with their products. FANUC recommends the following materials as being suitable for interface connector
- Page 395B–63833EN/03 B. 20–PIN INTERFACE CONNECTORS AND CABLES 10–pair cable (a) Specifications Item Unit Specifications Product No. – A66L–0001–0284#10P Manufacturer Hitachi Cable,Ltd. Oki Electric Cable, Co.,Ltd. SHINKO ELECTRIC INDUSTRIES CO., LTD. Rating – 60°C 30V:UL2789 80°C 30V:UL80276 Material Condu
- Page 396B. 20–PIN INTERFACE CONNECTORS AND CABLES B–63833EN/03 (b) Cable structure Wire identification table Insulator color Dot mark Dot mark color Pair No. Drain (1 pitch) First Second wire wire wire 1 1 Orange – Red Black Twisted 10 2 –pair 2 Gray – Red Black wire 6 3 white – Red Black Binding 9 3 tape 4
- Page 397B–63833EN/03 B. 20–PIN INTERFACE CONNECTORS AND CABLES Composite 12–core (a) Specifications cable Item Unit Specifications Product No. – A66L–0001–0286 Manufacturer – Oki Cable, Ltd. Hitachi Electric Cable Co., Ltd. SHINKO ELECTRIC INDUSTRIES CO., LTD. Rating – 80°C, 30V Material Conductor,braid–shi
- Page 398B. 20–PIN INTERFACE CONNECTORS AND CABLES B–63833EN/03 Item Unit Specifications Sheath Color – Black Standard thickness (The mini- mm 1.1 mum thickness is at least 85% of the standard thickness.) Outside diameter mm 8.5Max. 9.0(1) Standard length m 100 Packing method – Bundle Electrical Electric res
- Page 399B–63833EN/03 B. 20–PIN INTERFACE CONNECTORS AND CABLES (c) Specifications Item Specification FANUC specification number A66L–0001–0402 A66L–0001–0403 Manufacturer Oki Electric Cable Co., Ltd. A–conductor B–conductor A–conductor B–conductor Conductor Constitution 16/0.12 3/22/0.12 16/0.12 7/16/0.12 N
- Page 400B. 20–PIN INTERFACE CONNECTORS AND CABLES B–63833EN/03 Item Specification FANUC specification number A66L–0001–0402 A66L–0001–0403 Manufacturer Oki Electric Cable Co., Ltd. A–conductor B–conductor A–conductor B–conductor Finished Rating 80_C 30V assembly performance Standard Shall comply with UL STY
- Page 401B–63833EN/03 B. 20–PIN INTERFACE CONNECTORS AND CABLES 5–core coaxial cable (a) List of specifications Item Unit Description Specification – A66L–0001–0371 Manufacture – Hitachi Densen Number of Conductors – 5 Inside Conductor Size mm2 0.14 Components Conduc- 7/0.16 tors(PCS)/mm Material – Tin–coate
- Page 402B. 20–PIN INTERFACE CONNECTORS AND CABLES B–63833EN/03 Item Unit Description Impedanse (10MHz) Ω 75"5 Standard Capacitance (1MHz) nF/km 56 Standard Attenation (10MHz) dB/km 53 Estimated weight kg/km 105 Standard Length m 200 Package form – Bundle 1 Red RD 2 Red RD INTERPOSITION 9 Black BK 3 Green GN
- Page 403B–63833EN/03 C. CONNECTION CABLE (SUPPLIED FROM US) C CONNECTION CABLE (SUPPLIED FROM US) Maximum allowable cable length between units Maximum Cable type Use and condition cable length (m) MDI cable Control unit–to–MDI unit 50 m Stand–alone type display unit–to– 0.5 m MDI unit I/O Link cable Electri
- Page 404C. CONNECTION CABLE (SUPPLIED FROM US) B–63833EN/03 Purpose Description Specification Length MDI signal cable Control unit A02B–0120–K810 5m (JA2) µ PCR–E20F MDI unit (CK1) CRT/PDP video signal cable Control unit A02B–0120–K819 5m (JA1) MR–20FH µ FI40–20S–CV5 MR–20LW CRT/PDP unit (CN1) Monochrom CRT
- Page 405B–63833EN/03 C. CONNECTION CABLE (SUPPLIED FROM US) Purpose Description Specification Length Power supply cable for AMP2–178288–3 stand–alone type LCD unit A02B–0166–K880 55 cm Control unit (CPD2) µ Stand–alone type AMP1–178288–3 LCD (CP1A) Manual pulse generator cable (for one unit) FI40–2015S Cont
- Page 406C. CONNECTION CABLE (SUPPLIED FROM US) B–63833EN/03 Purpose Description Specification Length Spindle signal cable A03B–0807–K801 5m Control unit (JA7A) µ PCR–E20FA Spindle A03B–0807–K802 10m amplifier (JA7B) Control unit pow- M3 crimp style terminal er supply cable Voltage regulator A02B–0124–K830 5
- Page 407B–63833EN/03 D. OPTICAL FIBER CABLE D OPTICAL FIBER CABLE The Series 0i/0i Mate uses optical fiber cables for the following interfaces. This table lists the usable combinations. Interface Recommended Maximum allowable Applicable junc- Remark optical cable transmission distance tion adapter Serial sp
- Page 408D. OPTICAL FIBER CABLE B–63833EN/03 Notes on the (1) Supported optical fiber cables specifications of optical (a) Internal cord type cable: A66L–6001–0023#LjRjjj fiber cable C Cable length: 0.15 to 10 m Code diameter: 2.2 mm × 2 cords Tensile strength: Optical fiber cord 7 kg per cord Between optica
- Page 409B–63833EN/03 D. OPTICAL FIBER CABLE Table D.1 Standard cable length Internal cord type cable External cable A66L–6001–0023# A66L–6001–0026# Specification Length Specification Length L150R0 0.15 m L1R003 1.0 m L300R0 0.3 m L2R003 2.0 m L500R0 0.5 m L3R003 3.0 m L1R003 1.0 m L5R003 5.0 m L2R003 2.0 m
- Page 410D. OPTICAL FIBER CABLE B–63833EN/03 3. Procuring the cable All the optical fiber cables mentioned above are special cable products with optical connectors, which are designed, produced, and tested to ensure the required system performance and reliability. It is technically impossible for users to pr
- Page 411B–63833EN/03 D. OPTICAL FIBER CABLE Electrical/optical conversion module Lid Optical fiber cable Optical fiber cable caps Fig. D.3 Protection of electrical/optical conversion module and optical fiber cable (when not in use) (2) Optical fiber cable • Make sure that the bending radius and tensile stre
- Page 412D. OPTICAL FIBER CABLE B–63833EN/03 pull it. Because the combined tensile strength of the two cords is only 14 kg, however, avoid applying too great a force to the cable during installation, regardless of whether you have taken the protective measures. Optical connector Reinforcing cover Optical con
- Page 413B–63833EN/03 D. OPTICAL FIBER CABLE Reinforcing cover of external Optical connector Optical fiber cord cable or cord binding portion of internal cord type cable Bending radius of 25 mm or more (Make the bending radius as large as possible.) Bending radius of 50 mm or more (for reinforcing cover) Cab
- Page 414D. OPTICAL FIBER CABLE B–63833EN/03 5. Optical fiber cable relay When used for the FANUC I/O Link application, optical fiber cables can be connected by using an optical fiber adapter, as follows. (a) External view of an optical fiber adapter 32"0.3 10.16 R1.6 6.6 8.2 21"0.5 3.2 42"0.5 18.2"0.5 2.2 (
- Page 415B–63833EN/03 D. OPTICAL FIBER CABLE 6. Optical fiber cable relay of FANUC high–speed serial bus With the FANUC high–speed serial bus, special low–loss optical cables can be connected by using a special low–loss optical relay adapter as an optical fiber relay adapter. (a) External view of the low–los
- Page 416D. OPTICAL FIBER CABLE B–63833EN/03 7. Precautions for connection with low–loss optical junction adapter D Features of and handling precautions for low–loss optical junction adapter (A63L–0020–0004) When optical connectors for a conventional optical junction adapter (A63L–0020–0002) are jointed, the
- Page 417B–63833EN/03 D. OPTICAL FIBER CABLE 8. Installing the optical fiber junction adapter The optical fiber junction adapter should be installed within a cabinet, as a rule. If it is impossible to avoid installing it within a cabinet, protect the adapter and the optical cable portions (such as connectors
- Page 418D. OPTICAL FIBER CABLE B–63833EN/03 D Cleaning optical cables For the optical cables, it is important to clean the connectors at their ends. Any soiling on the optical fiber end surfaces will hamper optical transmission, resulting in a malfunction. Wipe the optical fiber end surfaces (that is, the f
- Page 419B–63833EN/03 E. ATTACHING A CRT PROTECTIVE COVER E ATTACHING A CRT PROTECTIVE COVER To satisfy the requirements for CE marking (machine directive), it is necessary to attach a CRT protective cover to the 9″ monochrome CRT display unit. The CRT display unit is already provided with a protective cover
- Page 420E. ATTACHING A CRT PROTECTIVE COVER B–63833EN/03 Bottom cover To be inserted under the metal plate Attaching a bottom cover (viewed from below) To be inserted under the metal plate To be inserted beside the Side cover metal plate Attaching a side cover (viewed from the side) CRT protective cover 406
- Page 421B–63833EN/03 F. MEMORY CARD INTERFACE F MEMORY CARD INTERFACE Overview Data I/O internal to the CNC can be performed for maintenance through the memory card interface in the control unit. This appendix F describes the memory card interface for data input/output. ATA CARD 1.Overview The flash ATA car
- Page 422F. MEMORY CARD INTERFACE B–63833EN/03 3.Flash ATA cards whose normal operation has been confirmed The following table shows that the ATA Flash cards which are confirmed to be worked on the Series 0i/0i Mate(note 1) by FANUC. (for June, 2003) The marks on the table mean bellow. Available: The card co
- Page 423B–63833EN/03 F. MEMORY CARD INTERFACE Table F(b) Compact flash card list Purpose Vendor Specification Capacity Remarks For Data For Data Input/Output Server SDCFB–64–801 64MB Ę — SDCFB–128–801 128MB Ę Ę Note 2 SDCFB–256–801 256MB Ę Ę SanDisk SDCFB–384–801 384MB Ę Ę SDCFB–512–801 512MB Ę Ę SDCFB–32–1
- Page 424
- Page 425B–63833EN/03 Index [Numbers] CNC Display Unit with PC Functions Having a Touch Panel and Soft Key, 285 20–pin Interface Connectors and Cables, 374 CNC Display Unit with PC Functions Having a Touch 2A DO (Output Signal) Connection, 190 Panel but No Soft Key, 284 2A Output Connector Pin Allocation, 18
- Page 426Index B–63833EN/03 Connections, 137 Environmental requirement, 151, 174 Connector (on the cable side) specifications, 147 Environmental Requirements Outside the Control Unit, 10 Connector Layout Diagram, 30, 292 External 24 VDC Power Supply and Circuit Configu- Connector Layout of the Small Machine
- Page 427B–63833EN/03 Index Installation Environment, 268 [O] Installation Environmental Conditions, 286 Operating environment, 296 Installation Method, 308 Operator’s panel specification, 174 Installation Space, 289 Optical Fiber Cable, 393 Installing the Control Unit, 27 Order specification, 151, 174 Inter
- Page 428Index B–63833EN/03 [S] Thermal Design of the Cabinet, 14 Separate Detector Interface, 91 Total Connection Diagram, 5, 136 Separate Detector Interface Unit Specification, 93 Turning On and Off the Power to the Control Unit, 36 Separating Signal Lines, 16 Serial Port 1, 304 Serial Port 2 + USB, 302 [U
- Page 429Revision Record FANUCĄSeriesĄ0i-MODEL B/0i Mate-MODEL B CONNECTION MANUAL (HARDWARE) (B–63833EN) D Addition of functions (such as small operator’s panel) 03 Nov., 2003 D Correction of errors D Deletion of Series 0i Mate–MODEL A 02 Aug., 2002 D Addition of Series 0i Mate–MODEL B 01 July, 2002 Edition
- Page 430
- Page 431TECHNICAL REPORT NO. TMN 04/078E Date :Aug .27, 2004 General Manager of CNC Laboratory FANUC Series 0i/0i Mate-MODEL B The correction of CONNECTION MANUAL (HARDWARE) 1. Communicate this report to: Your information only GE Fanuc-N, GE Fanuc-E FANUC Robotics MILACRON Machine tool builder Sales agency
- Page 432FANUC Series 0i/0i Mate-MODEL B The correction of CONNECTION MANUAL (HARDWARE) 1. Type of applied technical documents Name FANUC Series 0i-MODEL B/0i Mate-MODEL B CONNECTION MANUAL (HARDWARE) Spec.No./Version B-63833EN/03 2. Summary of change Group Name / Outline New, Add, Applicable Correct, Date D
- Page 433Appendix B. 20-PIN INTERFACE CONNECTOR AND CABLES Because the housing: Honda PCS-E20LA cannot be used for Series 0i/0i Mate-B, we delete this housing from Fig.B.3. Title Draw B-63833EN/03-3 No. Ed. Date Design Description page 2/3 Date Design. Apprv.
- Page 434Because the housing: Honda PCS-E20LA cannot be used for Series 0i/0i Mate-B, we delete this housing from Table.B.4. Title Draw B-63833EN/03-3 No. Ed. Date Design Description page 3/3 Date Design. Apprv.
- Page 435TECHNICAL REPORT (MANUAL) NO.TMN 05 /050E Date: 15 Jun, 2005 General Manager of CNC Laboratory Explanation Addition in FANUC Series 0i/0i Mate-MODEL B CONNECTION MANUAL (Hardware) (B-63833EN/03) 1. Communicate this report to: Your information GE Fanuc-N, GE Fanuc-E FANUC Robotics CINCINNATI MILACRON
- Page 436Explanation Addition in FANUC Series 0i/0i Mate-MODEL B CONNECTION MANUAL (Hardware) (B-63833EN/03) 1. Type of applied technical documents FANUC Series 0i/0i Mate-MODEL B Name CONNECTION MANUAL (Hardware) Spec. No. / B-63833EN/03 Version 2. Summary of change New, Add., Applicable Group Name / Outlin
- Page 437D OPTICAL FIBER CABLE Series 0i/0i Mate uses the optical fiber cables for the following interfaces. This table lists the usable combinations. Maximum Recommended allowable Applicable Interface Junction Remark Optical fiber cable transmission junction adapter distance A66L-6001-0026# None 100m Serial